Showing posts with label SCVMM. Show all posts

Thursday, March 14, 2019

System Center 2019 is now Generally Available!

Following on from last weeks post, Microsoft has just announced the General Availability release of System Center 2019.


This release is part of the long term servicing channel (LTSC) license model and comes with a support bandwidth of 10 years.

With full support for Windows Server 2019 across the stack, here's some of the additional capabilities that you get with System Center 2019:
  • VMM integration with Azure Update Management for simplified patching of virtual machines.
  • Better SCOM integration with Azure services such as Service Map to create automatic Distributed Application models based on server dependencies.
  • Azure Management Pack brings comprehensive alert and performance metrics from Azure resources into SCOM.
  • Along with a modernized and extensible SCOM full HTML web console, subscriptions and notifications are now modernized with support for HTML based email.
  • Maintenance schedules in SCOM with SQL server AlwaysOn are now supported.
  • SCOM Update and Recommendations feature for Linux workloads enables discovery of up-to-date MPs for Linux environments.
  • Linux monitoring is now resilient to SCOM management server failover.
  • All Windows Server Management Packs now support Windows Server 2019.
  • Dynamic Storage Optimization in VMM enables higher availability of workloads.
  • VMM now provides health and operational status of storage disks in Hyper Converged as well as disaggregated deployment.
  • New RBAC role in VMM ensures that IT admins can be provided access commensurate with their role and no more.
  • Support for latest versions of VMware in VMM (to enable migration to Hyper-V).
  • Faster backups with DPM with a 75% increase in speed and a monitoring experience for key backup parameters via Log Analytics.
  • DPM further supports backup of VMWare VMs including to tape.
  • Orchestrator supports PowerShellv4+.
  • Service Manager has an enhanced Active Directory connector.
  • Support for service logon across the System Center suite aligning with security best practice.
You can get your hands on this latest release from all of the normal download channels including Volume Licensing Center, my.visualstudio.com and also the Microsoft Evaluation Center.


Enjoy!

Monday, July 13, 2015

Quickly Check Build Numbers for Common Microsoft Applications

If you ever have a problem trying to identify which version of your application its build number relates to, then I've got something pretty useful to help you out.


For the past year I've been referencing a community-authored blog that posts current build number references for common Microsoft applications and provides a download link to each cumulative update or service pack.

The list of applications that are referenced include System Center and SQL (definitely one you'll use a lot here). It's regularly updated (the new 2016 Tech Preview releases are all there) and goes back quite a few versions - MOM 2000 is even listed!

There's a handy navigation ribbon to choose your application or if you like, just use the tags.

Here's the blog URL:


Tuesday, August 19, 2014

Useful Recent CloudOS News and Blogs

Well, after a few weeks away from work on vacation, I've finally managed to filter through the majority of my unread emails and Twitter feeds. What I've come across from browsing through just a few short weeks of them is a number of very useful and cool updates and community offerings for System Center 2012 R2, Windows Azure Pack, Azure and Windows Server 2012 R2.

I've broken my favourites down into categories to make things easier to reference and if you haven't seen some of these posts yet and are working with CloudOS products, then I'd strongly advise you to check them out:

SCOM

Jalasoft – Xian SNMP Device Simulator V5


SCOM 2012 – Display & Download MPs Using PowerShell Widgets


VMM

Download the VMM Network Builder

Blog Series: Bare Metal Post-Deployment


So that's it in a nutshell for now - and although it's not a comprehensive list of everything that's been happening over the past month or so, there's still a lot of very impressive community content around CloudOS.

Enjoy!

Monday, November 4, 2013

New SCVMM 2012 R2 Visio Stencils Available for Download


As a consultant, my job involves working closely with our sales and pre-sales teams to deliver comprehensive technical documentation for our customers around the solutions that we deliver. Good documentation is always more powerful when you include some decent Visio diagrams that give the reader a proper visualisation of what you're proposing.

Working with System Center over the last few years, I've learned quite a few tips and tricks to help me create nice visualisations by leveraging System Center Operations Manager (SCOM) and some nifty PowerShell scripts. Using these methods, I've created a number of Visio stencils that I think might be worthwhile sharing with the community and in this first post (hopefully I'll get around to doing a few more of them over the next week or so), I'd like to share my Visio stencil for the recently released System Center 2012 R2 - Virtual Machine Manager.

The stencil contains twenty images that should cover off all the roles and components of SCVMM 2012 R2.


You can download the stencil from the TechNet Gallery at the following link:

http://gallery.technet.microsoft.com/System-Center-2012-R2-7a5f1fcd

If you find this stencil useful, please take the time to give it a Star rating on the TechNet Gallery :)

Let me know if you have any suggestions or problems with the stencil by posting in the comments section below.

If you're looking for stencils for other System Center 2012 R2 products, then check out these links:

DPM 2012 R2 Visio Stencils

SCOM 2012 R2 Infrastructure Visio Stencils

SCOM 2012 R2 Application Visio Stencils

SCOM 2012 R2 APM & Networking Visio Stencils

Windows Azure Pack (WAP) & Azure Visio Stencils

Enjoy!

Thursday, January 10, 2013

SCVMM 2012 SP1 Virtual Networking Explained

This is a cross-post that I wanted to bring peoples attention to about something that a good friend of mine and fellow Irish System Center MVP Damian Flynn (aka Private Cloud Superhero) is involved in.

Update Feb 2013: I've added Damian's second post to the series below. Check them out!

System Center 2012 Service Pack 1 brings an amazing amount of new and enhanced functionality to the whole System Center suite of products. It's understandable that people want to go out and deploy this Service Pack as soon as possible and get working with all these new features but some of them need to be explained in a lot more detail than the information contained in the official technical documentation.


The Virtual Networking functionality in System Center 2012 Virtual Machine Manager (SCVMM) SP1 is one such example of this and Damian is one of the primary authors along with Microsoft's Nigel Cain (Senior Program Manager, Windows Server and System Center) of a new series of blog posts on the official SCVMM blog that aim to unwrap the complexities and teach you how to define, configure and manage Virtual Networks in SCVMM 2012 SP1.

The first blog post in this series has gone live since 8th January and they will be authoring a total of 8 posts over the next 6 months. If you are working with System Center 2012 or plan to deploy virtualisation anytime soon, then I absolutely recommend that you check out these posts to ramp up your knowledge and get the most out of your virtual environment.

You can check out the first two posts in the series here:

Virtual Networking in VMM 2012 SP1

Networking in VMM 2012 SP1 – Logical Networks (Part I)

I'll try to keep my own blog post here updated as Damian and Nigel release new ones.

Tuesday, December 4, 2012

Microsoft Service Templates and Template Explorer for System Center 2012

Just got an e-mail today about the availability of the Microsoft Service Templates for System Center 2012 and the Microsoft Service Template Explorer BETA's.


Having the ability to create service templates are an excellent addition to System Center 2012 Virtual Machine Manager (VMM) and I wrote up a post last year on how to create a basic service template here:

Cloud Management with System Center - Creating a Service Template with System Center Virtual Machine Manager 2012

Microsoft have now expanded on this concept and you can download service templates for Windows Server 2008 R2 and Windows Server 2012 to deliver automation of your server role deployments in a private cloud environment.

Use the new service templates to automate tasks, and reduce deployment time and cost by dynamically provisioning services that require Windows Server 2008 R2/2012 server roles for customer facing services.

The Service Template Explorer is an add-in that you can use in SCVMM to quickly discover and download new service templates from Microsoft - how cool is that!

To get access to these downloads, you will need to logon to the Microsoft Connect site and register for the BETA bits here:


The downloads come with some informative quick start guides that will walk you through the installation and configuration process in no time.

Monday, October 15, 2012

New Solution Accelerator Programs for SCVMM 2012 and SC Orchestrator

Microsoft's Travis Wright has just posted up some really cool information onto the System Center Virtual Machine Manager Engineering Blog about two new solution accelerators for System Center 2012 Virtual Machine Manager (SCVMM/VMM) and System Center 2012 Orchestrator (SCO\SCOrch).

I have been using Microsoft Solution Accelerators with System Center for a number of years and they're always an excellent addition to your deployments so well worth attending these sessions online.

A description of each of the new accelerators is below (taken directly from the original blog post):

One program will provide Virtual Machine Manager (SCVMM) service templates and a SCVMM add-in to help you discover them. The other program will provide datacenter automation for private clouds using System Center Orchestrator. Datacenter automation for System Center Orchestrator enables you to automate operations of private cloud workloads such as SharePoint and Windows Server.

You can join up to the 'System Center Virtual Machine Manager Service Templates and the Service Templates Explorer Beta Program' from here (you'll need to create a Microsoft Connect account for yourself with a Windows Live ID first if you haven't already got one):

https://connect.microsoft.com/site715/InvitationUse.aspx?ProgramID=7857&InvitationID=STE-B2VH-3JRX


To join the 'Datacenter Automation for the cloud Beta Program', just click here:

https://connect.microsoft.com/site715/InvitationUse.aspx?ProgramID=7858&InvitationID=DCAU-XFDX-V8XF

Check out Travis' full post on the new solution accelerators from here:

http://blogs.technet.com/b/scvmm/archive/2012/10/15/announcing-two-new-solution-accelerator-beta-programs-for-system-center-products.aspx

Enjoy!

Friday, June 22, 2012

IPD Guide for System Center 2012 - Virtual Machine Manager (BETA)

The new Infrastructure Planning and Design Guide (IPD) for System Center 2012 Virtual Machine Manager (VMM) is now available for BETA review from the Microsoft Connect Site.

The IPD guides are invaluable when designing a technology solution for your clients or own internal business and are the first port of call for me anytime I'm carrying out a new type of deployment for our customers.

This one is 40 pages long and deep dives into the VMM 2012 architecture, sample scenarios and design best practices.

You can register and download the VMM 2012 IPD from here:

https://connect.microsoft.com/InvitationUse.aspx?ProgramID=1587&InvitationID=IPDM-QX6H-7TTV&SiteID=14

Tuesday, February 21, 2012

Come along to the Official Irish Launch of Microsoft System Center 2012!

The official Irish and Northern Irish launches for System Center 2012 have been confirmed by Microsoft Ireland for March 22nd in Dublin and March 27th in Belfast.

I've been asked to present a session as one of four speakers alongside the presenting talents of Aidan Finn (MVP Virtual Machine), Damian Flynn (MVP Cloud and Datacenter Management) and Paul Keely (MVP Cloud and Datacenter Management)!

Each event is a full day out and kicks off at 10:00 until 17:00. The Dublin event is being held in the Berkley Court Hotel and the Belfast event is being held at the Hilton Hotel.

Here's the agenda for the day:


Time
Session
10:00 – 10:30
Event Registration
10:30 – 11:30
Hear how Microsoft takes the experience of running the largest datacentres in the world and applies it to scalable management solutions for customers worldwide
11:30 – 12:00
Damian Flynn from Lionbridge Technologies shares the cost savings and efficiencies achieved from implementing System Center
12:00 – 13:00
Lunch
13:05 – 16:15
Real-world examples from Industry Experts
Demonstration based sessions sharing scenarios that you can take and apply to your business. Examples include Deep Application Insights, Cloud and Data Centre – Automation and managing from the desktop to the datacentre


And here's the BIO's for each of the speakers:

Subject Matter Experts

Aidan Finn (MVP - Virtual Machine), works for MicroWarehouse Ltd as a technical sales lead, working with Microsoft partners on Hyper-V, System Center and Forefront opportunities. He has been working with systems management technologies since 1996, and is experienced with Windows Server, desktop deployment and management, System Center, virtualisation, and so on. He blogs on http://www.aidanfinn.com, tweets as @joe_elway, and has written or contributed to books such as Mastering Hyper-V Deployment and Mastering Windows 7 Deployment.

Damian Flynn (MVP – System Center Cloud & Data Centre), works for Lionbridge Technologies (a Localisation, Logo Certification, Search & Content Services Company) as a Technical Architect of Corporate IT Infrastructure, working with the Business Stakeholders, IT Team, and Partners. Damian is a member of the Microsoft Windows Sever Futures Council, actively participating in multiple Microsoft TAP programs, and has being working on infrastructure technologies since 1994, with a high level of experience in Networking, Storage, Linux and Windows Servers, Virtualisation, System Center, etc. He blogs on http://www.damianflynn.com, tweets from time to time on @damian_flynn, and is a contributing author on the forthcoming book “Microsoft Private Cloud Computing”.

Kevin Greene (Subject Matter Expert – Microsoft System Center Operations Manager), works for Ergo Group Ireland. Kevin has been responsible for the deployment of a large number of System Center projects to enterprise level clients across all sectors. He blogs at http://kevingreeneitblog.blogspot.com and you can also find him on Twitter as @kgreeneit

Paul Keely (MVP – System Center Cloud & Data Centre), Paul has been working with System Center in its original from form for nearly ten years. He works for Infront Consulting group, a specialist system center practice that deploys system center to some of the biggest companies in the world.


You can register for the event on the Irish IT Pro website by clicking on the link below:

http://blogs.technet.com/b/ieitpro/archive/2012/02/21/system-centre-2012-launch-events-in-dublin-and-belfast.aspx

Registration places have already been filled so hurry up before it's booked out and I hope to see you there!!

Wednesday, December 7, 2011

System Center 2012 Private Cloud Community Evaluation Program contest winner!!

Nice to see the email last night arrive into my inbox telling me that I had won the November competition for the Microsoft System Center 2012 Private Cloud Community Evaluation Program (CEP) as a result of my blog posts on 'Cloud Management with System Center'.

There were two aspects of the prize - a brand new Microsoft Touch Mouse and entry into a draw in February for a free MMS 2012 ticket!


If you want to learn more about Cloud Management with System Center, click on the links below for my posts:

Cloud Management with System Center - Building a Private Cloud with System Center Virtual Machine Manager 2012

Cloud Management with System Center - Creating a Virtual Machine Template with System Center Virtual Machine Manager 2012

Cloud Management with System Center - Creating a Service Template with System Center Virtual Machine Manager 2012

Cloud Management with System Center - Connecting your private cloud to System Center App Controller 2012

Cloud Management with System Center - Customizing System Center App Controller 2012

Cloud Management with System Center - Connecting App Controller to Azure Part 1

Cloud Management with System Center - Connecting App Controller to Azure Part 2

Cloud Management with System Center - Integrating App Controller with SCOM


The System Center 2012 Private Cloud CEP is running up until February and is open to anyone who wants to sign up. Click on the link below to start learning about how System Center is changing the way we manage our cloud infrastructures:

http://connect.microsoft.com/site799/program7383


Enjoy!

Friday, November 18, 2011

Cloud Management with System Center - Connecting App Controller to Azure Part 2

This is Part 2 of my post on 'Connecting App Controller to Azure'.These posts are part of a bigger series titled 'Cloud Management with System Center' and if you haven't read any of the other posts in the series, you can start from the links below:

Installing System Center App Controller 2012

Cloud Management with System Center - Building a Private Cloud with SCVMM 2012


In Part 1 of 'Connecting App Controller to Azure', I walked through the steps required to create a self-signed certificate on your App Controller server and how to export that into both .PFX and .CER formats.

With the certificates exported you are now ready to start working in Azure to get the connection created.

Adding your management certificate to Azure

The following procedure presumes that you already have a subscription setup within Windows Azure and are ready to add a management certificate to that subscription. If you haven't yet got a subscription or an Azure account, you can get more information here on whats needed to get you started.

First up, you need to login to the Windows Azure Platform Management Portal with the relevant credentials that allow you permissions on the subscription to add management certificates.

In the navigation pane, click 'Hosted Services, Storage Accounts & CDN' and then at the top of the navigation pane, click Management Certificates.


On the ribbon at the top left hand side of the screen, in the Certificates group, click Add Certificate

The Add New Management Certificate dialog box opens.

In Choose a subscription, select the Windows Azure subscription to add the management certificate to.

In Certificate file, use the Browse button to select the .CER file for the exported certificate


When you have all of the information added in, click 'OK'

Once created, you should see it listed under your subscription as below


Now that we have added the .cer certificate file to our Azure subscription, we need to create the connection between App Controller and Azure while adding the .pfx file with the encryption key to the App Controller connection.

Connecting App Controller to your Windows Azure Subscription

Open up the System Center App Controller 2012 console and click on the 'Clouds' link on the left hand side of the screen

Now click the 'Connect' button and then select 'Windows Azure Subscription' from the drop-down menu


In the 'Connect' dialog box, enter a name for this subscription. This name is displayed in the Name column of the Clouds page.

Add an optional description in the Description text box.

In the Subscription ID field, enter the subscription ID for this connection. The Windows Azure subscription ID is a GUID and can be found in the Windows Azure Management Portal.

To import the required management certificate, select the Personal Information Exchange (.pfx) file for the public key you uploaded to Windows Azure and enter the password for the certificate


Click 'OK' to create the connection

Once the connection is verified and complete, you will see your Azure Public Cloud available in App Controller for management under a single console


This completes the steps required to create the connection between your public Azure subscription and System Center App Controller 2012.

This series of posts also coincide with the new Microsoft Private Cloud Community Evaluation Program starting up and you can sign up at any time to the CEP by clicking on the link below (you will need a Microsoft Live ID to sign in):

Cloud Management with System Center - Connecting App Controller to Azure Part 1

Welcome to the sixth instalment in my series on 'Cloud Management with System Center' and in this post I will be explaining how to connect System Center App Controller 2012 (SCAC 2012) to the Microsoft public cloud offering - Azure.

If you want to know how to install System Center App Controller 2012 or haven't read the other posts in this series, then check out the links below for more information:

Installing System Center App Controller 2012

Cloud Management with System Center - Building a Private Cloud with SCVMM 2012


So, to begin with, here is a high level overview of what is required to connect your App Controller installation to a Windows Azure subscription:
  • Obtain / Create either a public or self-signed certificate for authentication
  • Add the certificate to Azure as a Management Certificate
  • Add the certificate to App Controller with Private Key attached
  • Create the connection within App Controller to connect to the Azure subscription
Sound easy so far? That's because it is! If you have a good handle on certificates and how they work, a basic knowledge of Azure subscriptions and a server or two to use, then you will be connected to the public cloud in no time!

For the purpose of this series, I will be using a self-signed certificate for authentication purposes but would always recommend using a trusted 3rd party CA in a production environment for additional security.

There are a number of ways that you can create a self-signed certificate and none of them are the right or wrong way but in this example, I will be using the IIS Manager on the App Controller server to create the certificate.

Using IIS to Create your Self-Signed Certificate

Open the Internet Information Services (IIS) Manager by typing inetmgr in the Start menu textbox

In the IIS section of the center pane, double-click Server Certificates


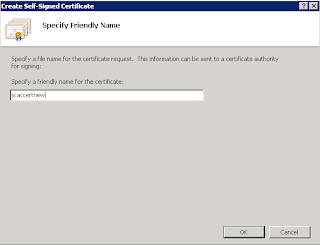
Click Create Self-Signed Certificate, and then finish the wizard


Once you have completed the certificate creation wizard, you will see your new certificate listed in the central window 'Server Certificates' window as below


Double clicking on the certificate will confirm to you that you have a new certificate issued today with a private key that corresponds to it


Now that we have our certificate created within IIS, we need to export this certificate as a .PFX file which essentially is your certificate with the private key attached and will be the file needed when creating the App Controller side of the connection

Exporting a .PFX file using IIS Manager

Open the Internet Information Services (IIS) Manager by typing inetmgr in the Start menu textbox and then in the IIS section of the center pane, double-click Server Certificates, right-click the certificate in the center pane, and then click Export.


Select the location for the file, enter the name for the file, and enter the password for the private key


Click 'OK' to complete the .PFX export.

Exporting the .CER certificate file with Certificate Manager

At this point we have our new self-signed certificate added to the Certificate ‘Local Computer\Personal Store’ of our App Controller server (the IIS certificate creation automatially does this) and we have also exported the certificate as a .pfx file which contains the private key of the certificate.

We must now export the certificate again from the personal store but this time we wont be exporting the private key and as such we want to end up with a certificate that ends in a .cer extension.

To do this, open up your Certificate ‘Local Computer\Personal Store’ by clicking on ‘Start’, ‘Run’ then typing ‘mmc’ and clicking ‘Enter’

Now click on ‘File’, select ‘Add/Remove Snapin’ and then double click on ‘Certificates’ from the ensuing list

This now opens up the ‘Certificates’ snapin and it is imperative that you select ‘Computer Account’ from the menu that comes up as below


Once you have selected ‘Computer Account’, click on ‘Next’ and then click ‘Finish’ from the next screen leaving the default selection of ‘Local Computer’ enabled

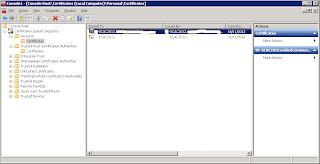
Now you need to expand down to the ‘Certificates\Personal\Certificates’ folder as below and you should see any certificates that have been created and self-signed to this server


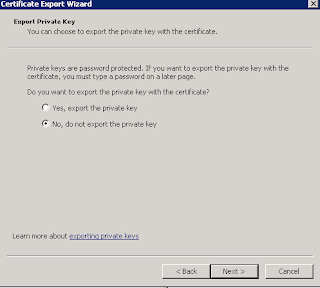
To export the certificate as a .cer file with no private key, follow the screenshots below


Make sure you select 'No, do not export the private key' here


You should now have two files on the C drive of your App Controller server, one is a .cer and the other is a .pfx


In the Part 2 of this post I will explain how to import these certificates into Azure and App Controller and also how to then configure the link between the two.

This series of posts also coincide with the new Microsoft Private Cloud Community Evaluation Program starting up and you can sign up at any time to the CEP by clicking on the link below (you will need a Microsoft Live ID to sign in):

Thursday, November 17, 2011

Cloud Management with System Center - Connecting your private cloud to System Center App Controller 2012

In this part of my 'Cloud Management with System Center' series I will explain how to connect your newly created private cloud within System Center Virtual Machine Manager 2012 (SCVMM 2012) to the newest member of Microsoft's System Center Suite - System Center App Controller 2012 (SCAC 2012).

If you want to know how to install System Center App Controller 2012, see my previous post:  Installing System Center App Controller 2012

See below for the links to the other posts in this series:

Cloud Management with System Center - Building a Private Cloud with System Center Virtual Machine Manager 2012

Cloud Management with System Center - Creating a Virtual Machine Template with System Center Virtual Machine Manager 2012

Cloud Management with System Center - Creating a Service Template with System Center Virtual Machine Manager 2012

This series coincides with the new Microsoft Private Cloud Community Evaluation Program starting up and you can sign up at any time to the CEP by clicking on the link below (you will need a Microsoft Live ID to sign in):

https://connect.microsoft.com/site799/program7383


Once you have SCAC 2012 and SCVMM 2012 installed, you should also have your private cloud configured, your virtual machine templates built and your new service template deployed to the private cloud. All that you need to do now is to connect your private cloud to App Controller to allow for central management of all private clouds in your environment with inegration and visibility between any public clouds you have deployed within Azure.

To begin, double click on the App Controller shortcut on your desktop to open up the logon page seen below


Enter your Active Directory credentials and then click 'Sign In'. This should then open up the App Controller overview screen


Now click on the 'Clouds' link from the left hand side of the screen and then click on the 'Connect' button to access a drop down menu that you then need to select 'VMM Server' from


In the 'Add a new VMM connection' box, enter a name for this connection. This name is displayed in the Name column of Clouds page.

Add an optional description in the Description text box.

In the Server name text box, enter the fully qualified domain name (FQDN) of the VMM management server.

In the Port field, enter a port number that matches the port used by the VMM management server (default: 8100).


Select 'Automatically import SSL certificates' if you plan to copy files and templates to and from VMM cloud libraries.

Note: SSL certificates must be imported to the App Controller server in order to copy files or templates to and from VMM cloud libraries. In order for the import to succeed, users need to be part of all of the following roles: the local administrator of the App Controller server, local administrator of the VMM server, and VMM administrator

Once you have entered all of you information,click 'OK' to create the connection between SCAC 2012 and your SCVMM 2012 servers.

You may then be asked to select which SCVMM user role to use from the new SCVMM server connection for the current session.

Once the link between the two applications has been configured, you should then see your private cloud from SCVMM 2012 available to manage within the 'Clouds' window of System Center App Controller as below


If you click on the 'Services' link on the left hand side, App Controller will show you all of the available services from your private clouds


Clicking on the 'Virtual Machines' link on the left hand side will reveal all of the virtual machines on your private cloud


The 'Library' link on the left hand side will show you a central library location that consolidates all of the templates across your cloud estate in one screen


And finally, to get a feel for the 'WOW' factor of App Controller, go back to the 'Services' link on the left hand side to view your deployed service applications again.
Now click on the 'Open Diagram' button above the list of deployed services

This opens up a nice quick Silverlight view of your deployed service application and allows for easy customization and zoom views at the click of a mouse

If you want to learn more about Cloud Management with System Center, click the link below for my next post:
 

Wednesday, November 16, 2011

Cloud Management with System Center - Creating a Service Template with System Center Virtual Machine Manager 2012

As part of my blog series on 'Cloud Management with System Center', this post will cover the creation of a Service Template within System Center Virtual Machine Manager 2012 (SCVMM 2012) and its deployment to your private cloud.

You can review the other posts in this series from the links below:

Cloud Management with System Center - Building a Private Cloud with System Center Virtual Machine Manager 2012

Cloud Management with System Center - Creating a Virtual Machine Template with System Center Virtual Machine Manager 2012


This series coincides with the new Microsoft Private Cloud Community Evaluation Program starting up and you can sign up at any time to the CEP by clicking on the link below (you will need a Microsoft Live ID to sign in):

https://connect.microsoft.com/site799/program7383

Creating the Service Template

The creation of Service Templates within SCVMM is a new concept and builds on the original idea of creating virtual machine templates for provisioning of resources to your hypervisors. Service Templates can be used to provision all the components that make up a service such as virtual machines, virtual networks, sequenced applications and load balancers in no more than a few clicks of a mouse!

The idea of a Service Template within SCVMM 2012 is similar to the Distributed Application/Service model in System Center Operations Manager (SCOM) and it is a representation of 'IT as a Service' within your environment.

To create the Service Template, open the SCVMM 2012 console, click on the 'Library' button from the wunderbar on the left hand side, expand 'Templates' and then click on the 'Service Templates' link. Now right mouse click on ‘Service Templates’ and click on ‘Create Service Template’


This will open up the ‘New Service Template’ window and will require you to select one of four options to begin your template design with.


I’ve selected the two tier option for simplicity but these are only guidelines and you may well want to just start from scratch with a blank template and design the tiers yourself.


You will see from the screen above that the template wizard has created a two tier service but has no references to any Virtual Machine templates or virtual networks at the moment. What you need to do now, is to drag and drop your virtual machine templates that are in your SCVMM 2012 library and displayed on the left hand side of the screen in the ‘VM Templates’ window onto each tier to populate them with data that is relevant to your environment templates.

Once you’ve dragged over your VM templates to each tier, you should then see something like this


As you can see here, we now have the VM templates imported over specifying the RAM, CPU, O/S and Virtual Network settings as taken from the Virtual Machine Templates earlier.

Now select the ‘Save and Validate’ button from the ribbon above to validate the Service Template and ensure that there are no errors within your configuration


If all is good, then you should see no more errors on each of the tiers of your Service Template as below


Now that you have built your new service template, you wil need to deploy it to a private cloud that has enough capacity to support each of the components of the service.

Deploying the Service Template to your Private Cloud

To deploy your Service Application template to your Private Cloud, you need to open up the ‘Library’ and then select ‘Service Templates’ within SCVMM 2012. You should see any service templates that you have created listed in here.

Select your desired Service Template, right mouse click on it and then select ‘Configure Deployment’ from the drop down menu


This will bring up a window asking you to type the name of the Service Instance and also the location that you want to deploy this to – in my case it’s ‘Ergo Private Cloud’


This will bring up the ‘Deploy Service’ window where you can check if there are any errors before deploying the service


If there are errors on any of the components of your Service Template, you can select the component with the error and click on the ‘Ratings’ button for a description of the error. The most likely cause of errors at this point of deployment are due to the Private Cloud you want to deploy to not having enough memory or disk space resources to host the new Service and all of its components


If there are no errors and you are happy to deploy the service, then click on the ‘Deploy Service’ button to begin the deployment of your Service Template to your Private Cloud


Check the ‘Jobs’ window for progress on the deployment of your service and once SCVMM 2012 has completed the deployment, you should see the following message in the ‘Jobs’ window


To confirm that the service has been deployed successfully, go to the ‘VMs and Services’ tab and expand the ‘Clouds’ option to see the contents of your Private Cloud


As above, you should see your newly deployed Service Template up and running within your new Private Cloud and fully manageable through the one console! Notice that the deployment wizard deployed multiple virtual machines to the private cloud virtual hosts and pre-configured them with all of the relevant settings, roles and features along with their virtual network placement too.

Now that's something that can save us all some time in future!!

Note:To learn more about the new Service Concept in SCVMM 2012, check out  the Technet Wiki post that 'Mr.Cloud' Kristian Nese (SCVMM MVP) wrote early this year. There are some caveats to watch out for when adding roles and features to your templates:


(Thanks for the heads up Kristian!!)

If you want to learn more about Cloud Management with System Center, click the link below for my next post:

Cloud Management with System Center - Connecting your private cloud to System Center App Controller 2012