Showing posts with label Powershell. Show all posts

Wednesday, June 12, 2019

SCOM 2019 Prerequisites Script

I've recently been involved in deploying some new SCOM 2019 environments for our customers and I thought it'd be a good time to publish an updated version of my original SCOM Prerequisites PowerShell script.


This SCOM prerequisites script is a lot simpler than my previous one and I've updated it to remove the requirement for .NET 3.5 Framework components as well as grabbing the new download locations for the updated versions of SQLSysClrTypes and Report Viewer.

If you have internet connectivity, the script will automatically download and install the SQLSysClrTypes and Report Viewer files from Microsoft's download site.

I've created two scripts to assist you (specific to the SCOM role you're deploying) and you can download them directly from my GitHub repo here:

https://github.com/kgreeneit/scom/tree/main/SCOM-2019/prereq-scripts


Enjoy!

Monday, April 10, 2017

SCOM - New Community MP for Monitoring Windows Services

A couple of months ago I came across a blog post from SCOM community contributor Andy Leibundgut describing a new management pack he'd authored to help monitor Windows Services using SCOM and I was keen to give it a test drive to see exactly what it could do.


Built-in Windows Service Monitoring Option

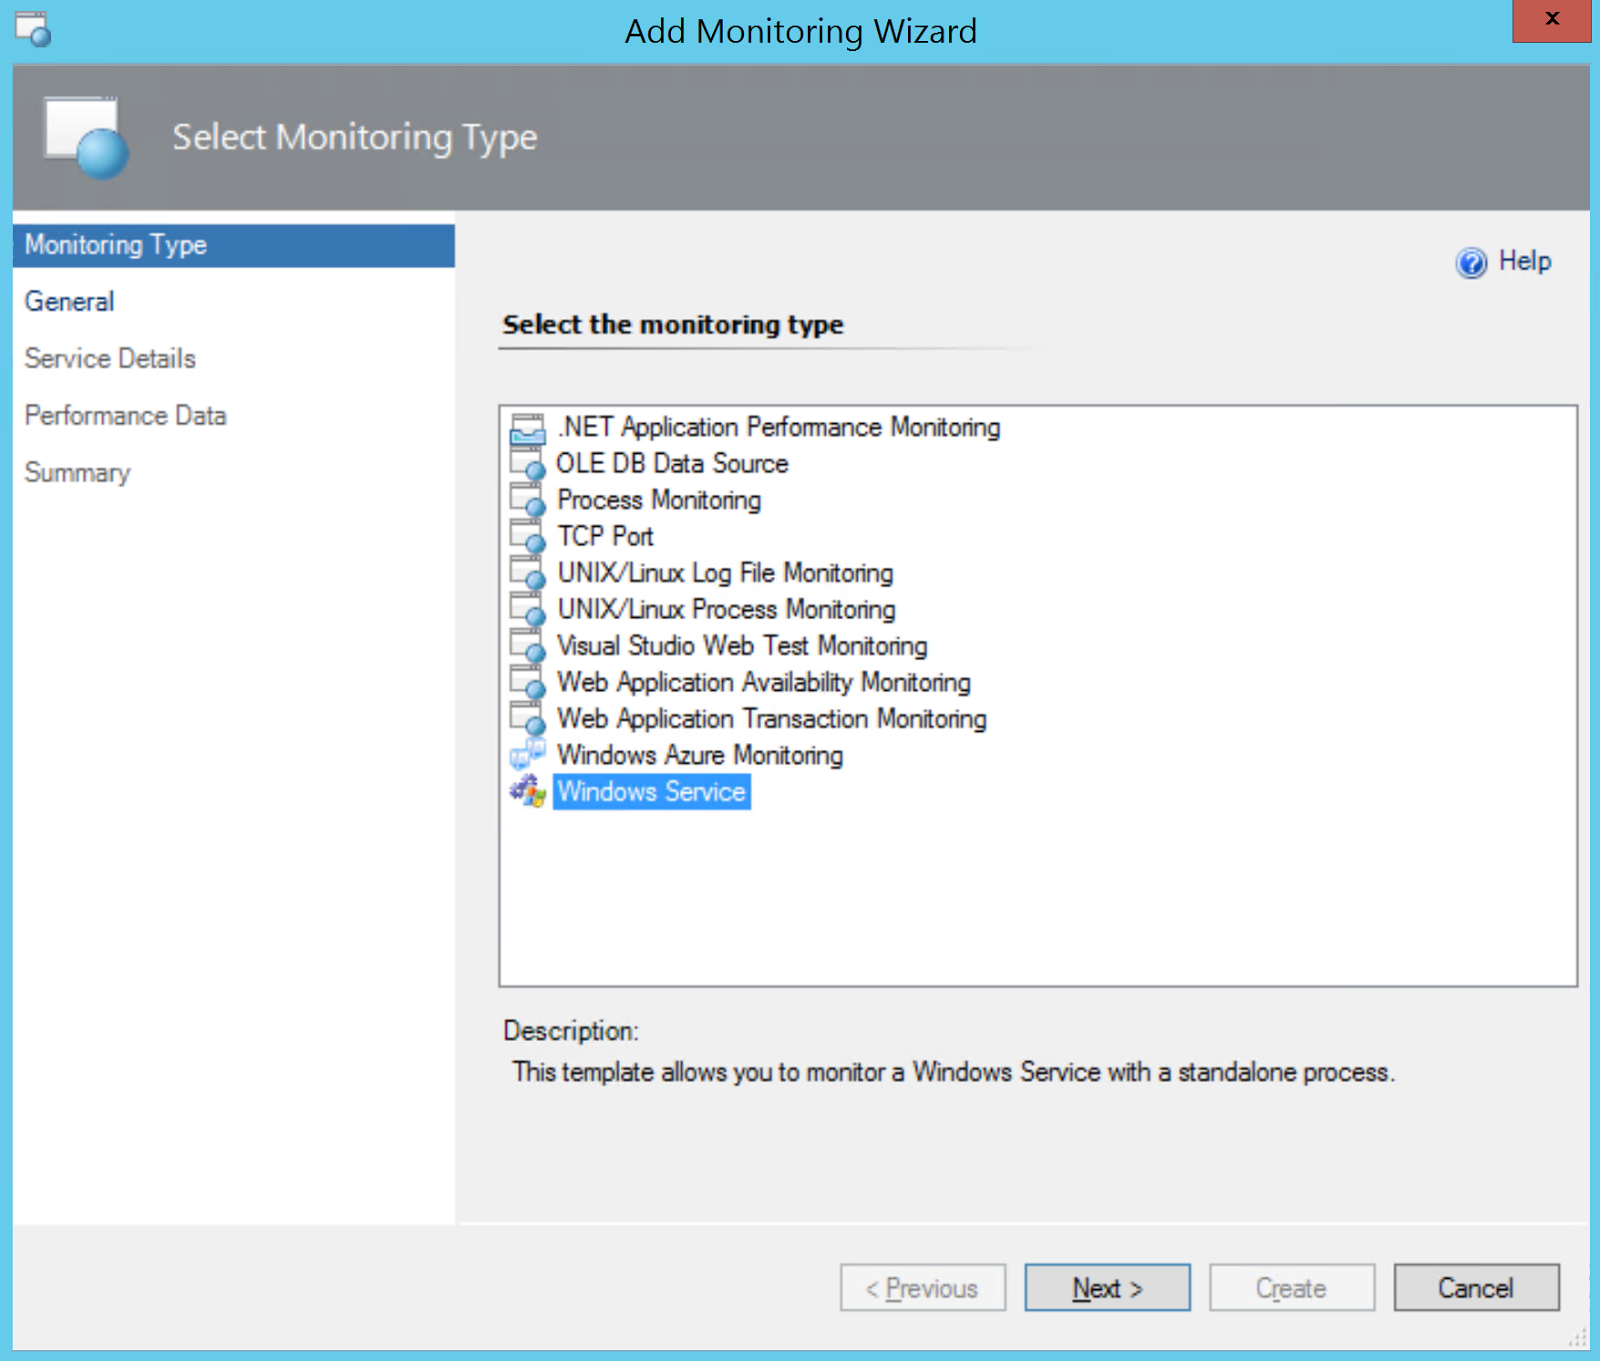
You might be thinking to yourself that this capability has to be available already out of the box with SCOM and you'd be correct. The Windows Service Monitoring Template (accessible from the Authoring workspace in the SCOM console and shown in the image below) will walk you through a wizard to help configure a custom monitor for a Windows Service that might not be automatically monitored with a vendor management pack.


The Problem

This template wizard certainly meets the requirements of bringing Windows services into SCOM but as Andy points out in his post, there's a lot of monitoring bloat that comes with each service monitoring configuration you create using the template - each service has its own class, its own discovery and comes with 3 monitors and 8 overrides!

Also, if you have a large number of custom Windows services to monitor (a common request from my customers), then using the built-in template in the console to create a monitor for each one can be fairly time-consuming.

The Solution

With these points in mind, Andy looked into a better method of spinning up monitors in SCOM for Windows services without having to deal with the extra bloat and cumbersome on-boarding process for multiple services. The solution he came up with comprises a new management pack and a PowerShell-based Service MP Editor complete with an easy-to-follow user interface (shown below).


Along with the Service MP Editor, the new management pack contains the following features for monitoring Windows Services:

  • Uses the same data source for Windows Service monitoring that SCOM uses.
  • Date and time filtering so you can exclude certain days/times from monitoring on a per-service or service object basis.
  • Handy console tasks for starting, stopping and checking the status of the Windows Service.
  • Automatic service recovery (disabled by default). Works on a 3 strikes and you’re out format (overrideable setting where after 3 failures in a 24 hour period it will stop trying to restart the service). 
  • Timer reset monitor (closes itself after 24 hours and enabled by default) to watch for and alert on the 3 strike out situation.
  • Monitor all service startup types with the exclusion of disabled services from alerting.
  • Custom discovery which discovers and adds all the service objects to one class rather than scattering them about like the templates do.

Taking the MP for a Test Drive

I've been running this MP solution in my demo and semi-production SCOM environments (both 2012 R2 and 2016) for the last couple of months with no issues and I felt it was about time to spread the word on how much effort you can save when you use it.

The first thing you'll need to do is to download the latest version of this management pack and you can get it from the TechNet Gallery here.

Next up, you'll want to get yourself a coffee (or beer, if that's how you roll) and take a read through Andy's original blog post using the link below:


Note: Everything you need to know is available in Andy's blog post and for clarity, I'll just blog my own experience on getting the MP up and running here.

When you download the zip file containing the MP, extract it to a location on a computer that runs the SCOM console and you should see the following three files...


The Readme.txt contains a note from the author highlighting the fact that this MP is still in it's early days of development and that you should always test it in a non-production environment first.

The WindowsServiceMonitor.xml file is the unsealed MP used for monitoring your Windows Services and the ServiceMPEditor.ps1 file is a clever PowerShell script that launches the UI-based editor to help you customize the MP for your own (and customer) environments.

Before we go any further, we need to import the WindowsServiceMonitor.xml file into SCOM using the Import Management Packs option from the Administration\Management Packs area in the console as shown here....


Next up, we'll create a temporary folder on the same computer that you've just used the console to import the management pack with. We'll create a folder in C:\Temp\SCOM (shown in the image below) but you can use whatever path you wish for this.


Once the folder has been created, launch a PowerShell window with administrative permissions and run the ServiceMPEditor.ps1 script to open the Service MP Editor similar to the following image...


Now, there's a specific order of steps that you need to follow when entering information into the Service Editor and for this part, I've borrowed the original numbered step-by-step image from Andy's blog post that should make things easy to understand...


If you want to add monitors for a small number of Windows Services, then follow these steps in order (we'll cover importing a larger list of services later):
  1. Management Server – type the name of one of your SCOM management servers in this field.
  2. Management Pack Location – type the location of the temporary folder that you created earlier (we'll use C:\Temp\SCOM) into this field.
  3. Get MP Config – clicking this button will export a copy of the original WindowsServiceMonitor.xml management pack from your SCOM environment into the temporary folder location specified in the previous step.
  4. New Service – a click of this button will ready the Service Name field to allow you start a new service configuration.
  5. Service Name – it's imperative that you type the exact 'Service name' of the Windows Service in here and not the 'Display Name' (refer to the example in the previous image taken from Andy's blog where he has highlighted the Service name for the Print Spooler service - which is simply named Spooler).
  6. Confirm Service Edit – clicking this after you've specified the Service name and are finished choosing all your service monitoring options.
  7. Save MP Config – click this button when you're finished editing and ready to commit your changes to the management pack.
Here's a screenshot of what the editor looks like in my demo environment where I've added three services (Windows Firewall, Windows Time and Print Spooler).


After you've clicked the Save MP Config button, you can close the editor and check that the C:\Temp\SCOM\WindowsServiceMonitor.xml management pack contains the newly added services...


Now re-import the management pack from your temporary location back into SCOM using the Import Management Packs from the console. You'll get a notification stating that the management pack is already installed and you can just ignore this and hit the Install button to re-import it again as shown here...


Once the management pack completes it's discovery, you should be able to see the newly monitored services light up in the Discovered Inventory view from the Monitoring workspace of the console (make sure to change the target for this view to WindowsService as shown below).


If you're impatient like me and don't want to wait for the discovery to kick in automatically (by default it's configured to run once a day), you can either reduce the discovery time with an override or simply bounce the Microsoft Monitoring Agent service on the server(s) running the service that you want monitored and you should then see the Discovered Inventory view populating like this...


To test the management pack, stop one of your newly monitored services and after a minute or so, you should see the service roll up as a critical state to the Windows Computer object that's hosting it as shown here in this diagram view...


The nice thing with this management pack is that it comes with some custom tasks to help you manage your monitored services and clicking the Start Service task from the pane on the left (shown below), will then restart the problematic service for you without the need to logon directly to the computer!


Note: You could also enable the automatic WindowsService.ServiceStart.Recovery task option from the Diagnostic and Recovery tab of the monitor to get SCOM to restart the service automatically itself in the event of it stopping unexpectedly. This recovery task will restart the service automatically up to 3 times before giving up and alerting you to the fact that the service is constantly being stopped and started.

Importing a Custom List of Services

If you have a large list of Windows Services that you want to monitor and don't fancy having to manually enter each one into the Service Editor, then there's a handy Import Services option that allows you to import a CSV file with the list of custom services that you want monitored.

You need to understand the format the CSV file needs to be in first however as if you get it wrong, you'll end up having to either edit the XML file directly or just start the whole process again.

Here's the steps I went through in the editor to get this bulk import option working:
  1. Management Server – type the name of one of your SCOM management servers in this field.
  2. Management Pack Location – type the location of the temporary folder that you created earlier (we'll use C:\Temp\SCOM) into this field.
  3. Get MP Config – clicking this button will export a copy of the original WindowsServiceMonitor.xml management pack from your SCOM environment into the temporary folder location specified in the previous step.
  4. Import Services –  this button is used to select a CSV file that contains a list of Windows Service names that you want to monitor. The CSV file must be named WindowsServiceMonitor.csv and needs to be located in the temporary folder location specified in the Management Pack Location field.
Here's a screenshot of the steps you need to take in the editor when you want to import a list from CSV....


When you click the Import Services button, you'll be presented with the warning below stating the name and location that your CSV file needs to have...


Assuming you've named your CSV file correctly and copied it to the temporary location specified in the warning dialog, click Yes to continue and you'll be presented with the custom list of services to be monitored as specified in the CSV you previously created.

CSV Creation Tip #1 - The  CSV file needs to be formatted with four column names (Service, Start, End, DaysofWeekMask) and you need to specify values similar to the image below...


CSV Creation Tip #2 - An easy way to quickly grab a CSV file in the correct format is to just manually add one or two Windows Services to the Service Editor and then use the Export Services button to export a template CSV file that you can edit as you need.

CSV Creation Tip #3 - You can export a full list of Windows Service names to a CSV file by using the following PowerShell command (this exported CSV file won't be in the correct format for the Service Editor so you'll need to then copy/paste the names from here into the previously created WindowsServiceMonitor.csv file):

Get-Service | Sort-Object -Property DisplayName | Export-CSV -path C:\winserviceexport.csv


When you're satisfied with the imported bulk list of Windows Services, the final step you need to complete in the editor is to hit the Save MP Config button to commit the changes to the MP.


Now all that's left to do is to close the editor and re-import the newly updated MP from your temporary location back into SCOM.

After the discovery process completes, you can see the full list of monitored services from the Discovered Inventory view similar to my demo environment here...


All credit goes to Andy Leibundgut for his contribution of this management pack to the SCOM community - and make sure to leave any comments you have on bugs or suggested improvements directly on his original blog post here.

Thursday, October 6, 2016

Updated: SCOM 2016 & 2012 R2 Prerequisites Script

Last year when I was starting work on my new Getting Started with Operations Manager book, I needed a PowerShell script that would help me deploy the SCOM 2016 and 2012 R2 prerequisites without fail every time.


The script was a derivative of an earlier SCOM 2012 SP1 script that I published a few years back and it worked fine up until the download link for the ReportViewer prerequisite changed to support Windows Server 2016. I had it on my to-do list to update this script to reflect the new download link but before I got around to it, I noticed that my good friend (and the tallest Dutch guy I know) Oskar Landman had taken my original script and added his scripting magic to it!

Oskar's updated script now has interactive prompts to check which version of SCOM you're installing and whether or not you are deploying the Web Console role (which requires the most prerequisites) - awesome!


Taking your inputs from those prompts, it will then go and download the SQLSysClrTypes and ReportViewer prerequisites to a folder of your choice, install them and then deploy all required roles and features based on your input - nice!

You can review Oskar's original blog post about his work on this script here.

The updated script can be downloaded from my GitHub repo here:


Wednesday, April 20, 2016

New OMS and Azure Hybrid Worker PowerShell Module Available

Today Tao Yang (the scripting and toolkit ninja from down-under) has just released another free PowerShell module - this time for the OMS and Azure Automation Hybrid Worker role.


Combining ideas from recent blog posts by Pete Zerger and Kevin Holman with some added knowledge based on real-world experience thrown in for good measure, Tao's HybridWorkerToolkit contains the following three PowerShell functions:

  • Get-HybridWorkerConfiguration - used to get the Hybrid Worker and Microsoft Monitoring Agent configuration.
  • Get-HybridWorkerJobRuntimeInfo - retrieves the following information about the Azure Automation runbook and the job run time.
  • New-HybridWorkerRunbookLogEntry - used to log event log entries.

Check out Tao's blog post for detailed information on each of these functions and if you're using Hybrid Workers with either OMS or Azure Automation, then I'd strongly recommend you download this module and give it a test drive.

It's available for download on both Github and the PowerShell Gallery.


Tuesday, January 5, 2016

Free OMS E-Book - Inside the Microsoft Operations Management Suite

Earlier today the preview version of a new free e-book on Microsoft's Operations Management Suite (OMS) was released. This book was authored by four of the best OMS ninja's around (Tao Yang, Stanislav Zhelyazkov, Pete Zerger and Anders Bengtsson) and after having a quick scan through its contents myself, I can already tell it's much more than your average 'low-page count' freebie.


With over 400 pages of technical goodness, you should find everything you need to know about OMS from the 12 chapters listed below in the book:

Chapter 1: Introduction and Onboarding
Chapter 2: Searching and Presenting OMS Data
Chapter 3: Alert Management
Chapter 4: Configuration Assessment and Change Tracking
Chapter 5: Working with Performance Data
Chapter 6: Process Automation and Desired State Configuration
Chapter 7: Backup and Disaster Recovery
Chapter 8: Security Configuration and Event Analysis
Chapter 9: Analyzing Network Data
Chapter 10: Accessing OMS Data Programmatically
Chapter 11: Custom Management Pack Authoring
Chapter 12: Cross-Platform Management and Automation


Whether you're a seasoned OMS aficionado or just a little curious about the next stage of Microsoft's cloud and datacenter management offerings, this book is for you.

Download it (FOR FREE!) here and make sure to give it a 5 star rating on the TechNet Gallery.

Thanks to the authors for all the hard work they've put into this - looking forward to learning loads from it!

Monday, July 13, 2015

Automating SCOM to Make Your Life Easier!

My buddy Tao Yang (the Tim-Tam distributing, management pack creation machine) has been at it again and has released Part 6 of his 'Automating OpsMgr' series.


If you work as a SCOM administrator or consultant in any way, shape or form, then you really need to read through each of these posts as they are awesome! You'll come away with heaps of tools, tips and tricks that Tao has spent tireless hours scripting and putting together for the community and they'll save you loads of time with your deployments.

As an example of how much effort he put into this, take the first post in the series. In this post Tao looked at the PowerShell module that comes bundled with the SCOM installation and also took a look at what was on offer with the System Center Orchestrator integration pack for SCOM and the SMA portable integration module.

These offerings are useful in their own right, but still lack a lot of functionality, so Tao decided to spend 5 months of his own time (on and off)  to write a new extended PowerShell module for SCOM! This new module contains administrative tasks for managing agents, configuring management group references and backing up management packs. It also contains some super tasks to assist with basic and advanced management pack authoring.

The module can be run on its own or as part of SMA and each function of the module contains some very detailed help references.

The other 5 posts (so far) build on this new extended SCOM PowerShell module and leverage SMA for automation to carry out tasks such as collecting logs from ConfigMgr, creating management pack runbooks and managing groups in SCOM.

I know Tao has many more of these posts to put up in the coming months so make sure to check out the whole series so far and download the module and scripts so you can start playing around with them today.

Use the following tag on his blog to access all his posts:

http://blog.tyang.org/tag/automating-opsmgr/

A big thanks Tao for yet another awesome contribution to the SCOM community!


Friday, June 12, 2015

SCOM - Agent Remediation Tool

Admittedly, I'm a little late to the party with this one but last week, I came across another useful community resource for SCOM called the 'Agent Remediation Tool'.

Here's a description of the tool taken from the authors blog (I can't track down their name unfortunately to give them more credit!):

"This is a proof of concept script consisting of a mix of PowerShell with some .NET for a GUI that can serve as an automated playbook for agent remediation.

Typically I prefer to remediate agents via the SCOM console, but there are instances where an agent is locked down such that remote management is not possible, and the SCOM Team may not have access to remote a server and fix an agent. This script empowers non SCOM sysadmins, DBA’s et cetera to be able to perform basic troubleshooting on their agents without the fear of accidentally deleting the wrong thing."

The tool comes in the form of a PowerShell script and when you run the script you'll get the handy little UI shown here....


If you or your customers have remote branch offices or DMZ's with manually deployed SCOM agents and with the 'Remotely Manageable' option disabled, then this little utility can be a useful addition to your toolkit. I've tested this tool on SCOM 2012 R2 and SCOM 2016 Technical Preview builds and it works a treat.

Check out the original blog post here and download the tool from the TechNet Gallery at this link:

https://gallery.technet.microsoft.com/OpsConfig-Agent-Remediation-3a1a9f10


SCOM 2016 & 2012 R2 Prerequisites Script

Lately, I've been working a lot in my lab with the Tech Preview build of the upcoming SCOM 2016 release and as is always the case when you deploy new builds of SCOM, there's a load of prerequisites to install before you can get stuck in.


I've updated my original SCOM 2012 SP1 PowerShell script from here to include the relevant prereqs for SCOM 2016 and SCOM 2012 R2.

This version has some new aesthetics built-in and will download and install the SQLSysClrTypes and ReportViewer utilities to a folder location of your choice (modify the $dwnld variable to specify a folder).

The updated script can be downloaded from my GitHub repo here:


Monday, December 15, 2014

Another (Equally Cool) Way to Build Your Own SCOM MP Store!

Following on from my recent post about building a SCOM management pack catalog using SharePoint or SharePoint online, Microsoft's Dirk Brinkmann has put together his own solution to help you download, categorize and then store all of your management packs in one handy and automated way.

He's written a three-part blog series using PowerShell and some free scripts written by other SCOM community members and it's definitely worth a read - particularly if you manage environments with multiple management groups (Test/Dev/Production etc.)

Have a read of Part 1, Part 2 and Part 3 of the series before downloading the relevant scripts from the TechNet Gallery from the links below:

A big thanks to Dirk, Tao and the rest of the guys for their work on bringing these solutions to the community!

Enjoy :)

Tuesday, August 19, 2014

Useful Recent CloudOS News and Blogs

Well, after a few weeks away from work on vacation, I've finally managed to filter through the majority of my unread emails and Twitter feeds. What I've come across from browsing through just a few short weeks of them is a number of very useful and cool updates and community offerings for System Center 2012 R2, Windows Azure Pack, Azure and Windows Server 2012 R2.

I've broken my favourites down into categories to make things easier to reference and if you haven't seen some of these posts yet and are working with CloudOS products, then I'd strongly advise you to check them out:

SCOM

Jalasoft – Xian SNMP Device Simulator V5


SCOM 2012 – Display & Download MPs Using PowerShell Widgets


VMM

Download the VMM Network Builder

Blog Series: Bare Metal Post-Deployment


So that's it in a nutshell for now - and although it's not a comprehensive list of everything that's been happening over the past month or so, there's still a lot of very impressive community content around CloudOS.

Enjoy!

Thursday, February 6, 2014

E-Book Gallery for Microsoft Technologies - Your One Stop Shop!

I've just seen a tweet from Microsoft's Yung Chou about a relatively unknown TechNet Wiki page titled the 'E-Book Gallery for Microsoft Technologies'.


This Wiki page has easily over 100 different E-Books covering technologies such as Lync, SharePoint, SQL, System Center, Visual Studio, Azure (the list goes on and on) and there's also a diverse number of e-books in languages other than English.


The best thing about all these e-books is of course that they're all FREE!
 
I highly recommend you check out this excellent resource and get the downloads going for as many of them as you need to keep in touch with the growing number of different technologies that Microsoft has to offer.

Check out the Wiki here:

http://social.technet.microsoft.com/wiki/contents/articles/11608.e-book-gallery-for-microsoft-technologies.aspx

Enjoy :)

Saturday, December 29, 2012

Learn PowerShell As Your New Year's Resolution

With New Year's Eve just around the corner, some of us may be thinking of making some New Year resolutions and personally, I find that the resolutions I tend to stick with are the ones where I commit to learning something new (as opposed to promising myself that I'll go for 5km jogs 4 days a week!)

With this in mind, I've promised myself that I'll really push on this year and go learn PowerShell v3 to bring me up to a proficient level that removes the requirement for me to constantly search the internet everytime I want to write a script to help with automating System Center.


To help me along the way with this, I've come across a few books and resources (see below) that will go a long way to helping me achieve my goal.

Books

There are absolutely so many books out there on PowerShell and I'm just gonna list the ones that I'll be reading through, but if anyone is reading this post and has some recommendations they want me to add to the list, then feel free to leave a comment below and I'll drop it in.

Learn Windows PowerShell 3 in a Month of Lunches (Authors: Don Jones and Jeff Hicks)

Learn Windows PowerShell in a Month of Lunches (Author: Don Jones)

Windows PowerShell 3.0 Step by Step (Author: Ed Wilson)

Windows PowerShell Cookbook: The Complete Guide to Scripting Microsoft's Command Shell (Author: Lee Holmes)


MVPs

If you are looking for free PowerShell resources from the community, then a great place to start is to check out the list of PowerShell MVP's on the Microsoft MVP site. Track down any blogs and Twitter accounts that these MVP's run and you'll be overloaded with great info in no time!

Click here for the link for the PowerShell MVP search.


Blogs

Windows PowerShell Blog

The PowerShell Guy

PowerShell Code Repository

Jeff Wouters's Blog

Poshoholic

Hopefully the list above is enough to get you started. I'll add to it as I come across additional resources on my journey to improving my PoSh Kung Fu!

Saturday, November 13, 2010

Bulk Create Active Directory User Accounts and Exchange Mailboxes

Although this process is fairly well known at this point, I am continually asked for this PowerShell script to assist with the bulk creation of new Active Directory user accounts with passwords and then the bulk creation of Exchange Mailboxes for these new accounts. It will also allow you to create or specify an OU to place them into.

This script was created by Exchange MVP Andy Grogan.

Here's the link to the downloadable Powershell Script and sample CSV file that creates the user accounts within Active Directory:

http://www.telnetport25.com/component/content/article/15-powershell/321-quick-post-script-to-create-lab-users-powershell-version.html

Once you have modified the CSV file to suit your user structure and run the Powershell script, you should now have all of the users created within AD and all assigned passwords of your choice too.

The next step is to create new Exchange mailboxes for those users using the following process:

 You open the Exchange Management Shell and begin with Get-User.


If we imagine we have an OU we wish to grab all the users from we could just type Get-User –OrganizationalUnit <OU Name>. However, this will return to us all the users in that OU, whereas perhaps some are already mailbox enabled. To narrow down our grab we can use a request for RecipientType which we could say is equal to User (as opposed to UserMailbox, which would mean they already have a mailbox).

So, for example, if we want to locate all users in the Accounts OU that do not have mailboxes already for their accounts we could type:

Get-User –OrganizationalUnit Accounts | Where-Object [$_.RecipientType –eq "User"}

That command would get us part of the way there.

Now if we wanted to mailbox enable those users we would append to the end:

Enable-Mailbox –Database "<Name of Database>"

So, let’s say in our setup here we have the Accounts users in the Accounts OU and we want them all given mailboxes in a database called EX2010Database.

We would type the full command:
Get-User –OrganizationalUnit Accounts | Where-Object [$_.RecipientType –eq "User"} | Enable-Mailbox –Database "EX2010Database"

Now just sit back and let the script do all the hard work!

Sunday, October 31, 2010

Exchange 2010 Remote Management using Powershell

I've been doing a lot of work recently with Exchange 2010 and Powershell and have come across this neat way of managing the Exchange Server within your network from a remote client PC without having to install the Exchange Management Tools and do it through the GUI.


You need to complete these commands from a Windows 7 client machine (or any machine that has Powershell installed) for it to work.


Firstly, you need to enable remote scripts to run on your Windows 7 machine by typing the following command from an elevated Powershell prompt:


Set-executionpolicy remotesigned
At this point, it's worth trying to input an administrative Exchange Powershell command into your client to see if it understands it. Try entering something like:  get-mailbox

Your Windows 7 client will come back with an error stating that the command is not recognisable as an internal Powershell cmdlet - this is correct as we haven't imported the Exchange 2010 session into the local client's Powershell Library yet

Once the 'set-executionpolicy remotesigned' command is completed, enter the following commands to get control of your Exchange 2010 server:
$session = New-PSSession –ConfigurationName Microsoft.Exchange –ConnectionUri http://servername.domainname.local/PowerShell -Authentication Kerberos


(This command makes contact with the Exchange 2010 server and initiates a new Powershell session -don't forget to substitute your own servername and domainname into the line above!)
Import-PSSession $session

(This command then imports the new Powershell session into the local client library)


Now try to run the get-mailbox command again or any other Exchange 2010 Powershell command for that matter and you should now be able to work through administering your server remotely from your client pc!