Showing posts with label SCORCH. Show all posts

Thursday, June 19, 2014

TechCamp 2014 Dublin

Day 1 for our TechCamp 2014 event has just finished and each session had a great turnout of attendees. Microsoft Ireland's Art Coughlan kicked off with a keynote speech on how Microsoft can help people with their journey to the cloud and he gave some great real-world examples of well known global brands using Cloud Technologies such as Azure, Hyper-V and System Center.

After the keynote this morning, Aidan Finn gave a really interesting session on Windows Server Storage Spaces and Scale Out File Servers. He walked through building the solutions in his demo step-by-step to give people an idea of how easy it is to get started.

After Aidan's presentation, it was my turn to get down and dirty and shake with datacentre automation in my 'Service Automation Using System Center' session. I first spoke about getting your automation processes properly mapped out and including the right teams to plan the process. Then I went into a demonstration that incorporated System Center Orchestrator, Service Manager and Windows Azure Pack. Thankfully my themed Windows Azure Pack Tenant Portal went down well and I received some nice attendee comments during lunch about it:


The 'New Hire Onboard' process that I automated was made possible using System Center Orchestrator and Service Manager integrated into Windows Azure Pack. The secret sauce to surface the request management in the WAP Tenant portal was delivered using the awesome new GridPro Request Management - check it out here: http://www.gridprosoftware.com/en/products/requestmanagement)


After lunch, Damian Flynn took to the stage and gave a full overview to the audience on how all the System Center components integrate with each other and then he went into the Windows Azure Pack Framework and all it's moving parts - a very enjoyable session for the attendees with the 'F Bombs' dropped kept to a minimum ;)

The final presentation of the day saw Aidan get back up for more heckling as he spoke about this time on Hybrid Cloud using Microsoft Azure. Some really interesting demo's delivered to the audience configuring public-cloud VM's and virtual networking on the fly.

That wraps up Day 1, tomorrow's track of 'Software as a Service' should be a blast!

Thursday, August 29, 2013

New System Center 2012 - Orchestrator Book Available Now!

This blog has been real quiet of late due to me putting the finishing touches to our upcoming "Mastering Windows Server 2012 R2" book, but I wanted to do up a quick post here to highlight another book which was authored by some really good friends of mine in the System Center community.


This book is based on System Center 2012 - Orchestrator and is an excellent place to go to learn about Microsoft's automation solution in the System Center suite. Here's an excerpt from the book's description:

"Microsoft System Center Orchestrator 2012 simplifies the process of automating systems administration tasks. Originally a third-party product named Opalis, which Microsoft acquired in 2009, Orchestrator provides a simplified way of building complex automation. System Center Orchestrator is a complete solution that goes beyond basic automation.
"Microsoft System Center 2012 Orchestrator Cookbook" will teach you how to plan, create and manage powerful runbooks to help you automate mission-critical and routine administration tasks.
In this practical Cookbook you will learn how to master System Center 2012 by creating runbooks to control and automate every feature possible. You will start by learning how to efficiently install and secure System Center Orchestrator."

I've just purchased a copy and you can get your own copy of the book today in 'dead-tree' format from here or in electronic format from here.

Enjoy!

Monday, January 7, 2013

System Center 2012 Orchestrator (SCORCH 2012) - Installing Service Pack 1 RTM

At long last the final Release To Manufacturing (RTM) version bits of Service Pack 1 (SP1) for System Center 2012 are generally available (GA). 

This Service Pack has been highly anticipated as it not only delivers the customary bug fixes that are to be expected with any such release , but it also brings a large number of new exciting feature additions and enhancements.

This post is one of a number of posts that I've been working on to help people get upgraded to System Center 2012 Service Pack 1. You can check out my other posts here:


The following list contains some of the enhancements that SP1 brings to System Center 2012 Orchestrator (SCORCH/SCO 2012)
  • Support for Windows Server 2012
  • Support for SQL Server 2012
  • New Exchange Administrator Integration Pack for Orchestrator in System Center 2012 SP1
  • New Exchange Users Integration Pack for Orchestrator in System Center 2012 SP1
  • New Representational State Transfer (REST) Integration Pack Guide for Orchestrator in System Center 2012 SP1
  • Updated Active Directory Integration Pack for System Center 2012 - Orchestrator
  • Updated HP Service Manager Integration Pack for System Center 2012 - Orchestrator
  • Updated System Center Integration Pack for System Center 2012 Operations Manager
  • Updated System Center Integration Pack for System Center 2012 Virtual Machine Manager
  • Updated VMware vSphere Integration Pack for System Center 2012 - Orchestrator
Be aware that System Center 2012 Service Pack 1 contains updates for the whole suite of products (not just Orchestrator) and it's advised that you follow a particular upgrade sequence of each product as per this warning:

If you are planning to upgrade two or more System Center components, it is imperative that you first consult the guide 'Upgrade Sequencing for System Center 2012 SP1'. The order in which you perform component upgrades is important. Failure to follow the correct upgrade sequence might result in component failure for which no recovery options exist

If you are happy enough with your product upgrade sequence and are now ready to start the Orchestrator 2012 RTM upgrade to Service Pack 1, then this blog post will detail the pre and post SP1 upgrade tasks that you need to consider along with the deployment of SP1 to your Orchestrator server infrastructure.
Some of the information contained in this post will be taken directly from the accompanying 'Orch12_UpgradeSP1' guide from Microsoft.

Orchestrator 2012 SP1 Pre-Upgrade Tasks

1. Complete all runbooks running in your current Orchestrator installation and ensure they are in a stopped state. For information about stopping runbooks, see the Running Runbooks topic in the Orchestrator library on TechNet.

2. Close any open programs and ensure that there are no pending restarts on the computer. If possible and as a precaution, just restart the Orchestrator server(s) to alleviate this issue.

3. Perform a full backup of the Orchestrator database. For information about backing up the Orchestrator database, see the How to Back up Orchestrator topic in the Orchestrator library on TechNet. You can also use tools provided by SQL Server to back up the Orchestrator database. For more information, see Backing Up and Restoring Databases in SQL Server.

4. Upgrade your hardware, operating system, and other software if necessary to meet the requirements of Orchestrator in System Center 2012 SP1. You can review the SP1 requirements for Orchestrator here.

Before we continue with the upgrade, it's worth mentioning a note in the upgrade guide about System Center 2012 components and their associated integration packs:

Note
To allow you the leeway to upgrade other System Center components as needed, after you have upgraded the Orchestrator servers to System Center 2012 SP1, you can run:
  • A System Center 2012 integration pack against a System Center 2012 component.
  • A System Center 2012 SP1 integration pack against a System Center 2012 SP1 component.
  • No other configurations are supported.

High-Level Overview

Here's a high-level overview of what's involved to get your Orchestrator 2012 environment upgraded to SP1:
  1. If using SCOM 2012 to monitor your Orchestrator environment, put all of the Orchestrator servers in to maintenance mode.
  2. Uninstall any other System Center 2012 product stand-alone consoles (e.g. SCOM or SCVMM consoles)
  3. Uninstall the Orchestrator management server, any runbook servers, the Web Service, and the Runbook Designer.
  4. Install the Orchestrator management server in System Center 2012 SP1, as described in the Deployment Guide
  5. Install any Orchestrator runbook servers in System Center 2012 SP1.
  6. Install the Orchestrator Runbook Designer in System Center 2012 SP1.
  7. If needed, install the Orchestrator Web Service in System Center 2012 SP1.
  8. Take the Orchestrator servers out of maintenance mode.
  9. Update System Center 2012 Orchestrator Integration packs to SP1
  10. Return to the Upgrade Sequencing Guide.
Place Servers into Maintenance Mode in SCOM

If you are monitoring your Orchestrator 2012 servers with SCOM 2012, then it's a good idea to place these servers into Maintenance Mode in SCOM before you start upgrading them to SP1. Doing this will stop any alert storms notifying you that Orchestrator isn't functional and will ensure that your SLA's are maintained.

To place your Orchestrator 2012 servers into Maintenance Mode follow these steps:

Open the SCOM 2012 Operations console, click on the Monitoring tab from the wunderbar and then expand the System Center Orchestrator folder and click on the Management Servers state view as shown below


Now you can right-mouse click on your Orchestrator 2012 servers and choose the Maintenance Mode\Start Maintenance Mode options from the flash out menu to be presented with the Maintenance Mode Settings dialog box. As below, select the Planned radio box, choose a category and specify a duration value for how long you will have the server in Maintenance Mode, then click OK


You should then have an icon with a picture of a wrench located beside your Orchestrator 2012 server(s) as well as a status of Not Monitored indicating that you have placed it into Maintenance Mode.

Uninstall Other System Center 2012 Product Consoles

If you have integrated Orchestrator with any of the other System Center 2012 products, then you will have the relevant stand-alone console for the integrated product installed on your Orchestrator server(s). These consoles will first need to be uninstalled before you upgrade to SP1. As a matter of fact, if you follow the Upgrade Sequencing for System Center 2012 SP1 guide, you will see that some of these consoles will need to be uninstalled anyway as part of the products own SP1 upgrade.

To uninstall the stand-alone consoles, logon to the Orchestrator server, click Start, type appwiz.cpl as below


This will open up the Programs and Features window and from here, you can right-mouse click on the stand-alone console that you want to remove and simply click on the Uninstall/Change button similar to what I've done in the example below for the SCOM 2012 console


Now just follow the onscreen wizard for the relevant System Center application to remove the stand-alone console (SCOM/SCVMM/DPM etc.)

Uninstall the Orchestrator Server Components

The next step in the upgrade process is to uninstall the Orchestrator management server, any runbook servers, the Runbook Designer and the Web service. These components will be reinstalled later as part of the SP1 upgrade.

Similar to the uninstall process above, with an account with administrative permissions, logon to the Orchestrator server, click Start, type appwiz.cpl and then hit Enter to open up the Programs and Features window.

From here, you can right-mouse click on the Orchestrator Server component that you want to remove and simply click on the Uninstall/Change button as below.


Repeat this step until you have removed all of the Orchestrator server components (management server, any runbook servers, the Runbook Designer and the Web service) from your Orchestrator server(s).

Once you have uninstalled all of the Orhcestrator server components, I'd recommend a restart of the  server(s) just to ensure that there are no open files or stale registry keys before we proceed with our upgrade to SP1.

Install the SP1 Orchestrator Server Components

To install the SP1 Orchestrator server components, logon with an account that has administrative permissions and then browse to the location on your server that you have mounted or extracted the System Center 2012 Orchestrator Service Pack 1 media to.

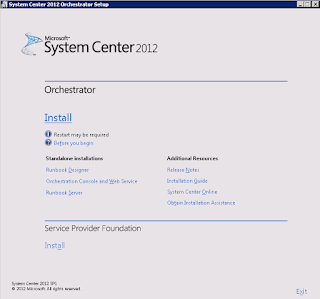
Now locate the SetupOrchestrator executable, right-mouse click on it and choose the Run as Administrator option as below


From the System Center 2012 Orchestrator Setup splash screen, click on the Install option below the Orchestrator heading to continue


At the Product Registration screen, enter your company info and product key, then click Next to continue


Read the license terms from the next page, accept them, then click Next to continue


From the Select Features to Install window, choose the relevant Orchestrator server components that you wish to install and then click Next (in my example below, all of the components are on the same server so I can just leave them all selected.)


At the Configure the Service Account window, enter the service account credentials that you would have used when you initially installed Orchestrator 2012, click the Test button to confirm they are entered correctly and then press Next to move on


From the Configure the Database Server window, enter the SQL server and instance along with the relevant authentication and port information and then click Test Database Connection. If the database connection test succeeds, click Next to continue.


Now from the Configure the Database screen, select the Existing Database option and choose the original database that you had deployed Orchestrator 2012 RTM to. Click Next to move on.


Choose the Orchestrator users group and select the option to grant remote access to the Runbook Designer -or just leave the default settings as they are here, then click Next


Choose your ports for the Web services or just leave them at their default settings, then click Next


From the next screen, select the installation location or again leave at the default setting, then click Next


Configure the Customer Experience Improvement Program (CEIP) settings in the next screen and then click Next


Finally, at the Installation Summary screen, verify all of your configuration settings, then click the Install button to begin the upgrade to SP1


All going well, you should see the screen below confirming that you have completed Setup successfully


Now, when you open up the Orchestrator Runbook Designer, you can see that all of your previous runbooks are still present along with their associated integration packs too


To verify that you have indeed now upgraded your Orchestrator deployment to System Center 2012 Service Pack 1, click on the Help menu and then choose the About option and you will see that SP1 has been applied as shown below


Take Servers out of Maintenance Mode in SCOM

Once the upgrade process is complete, if you haven't placed a time limit on your Maintenance Mode configuration of the SCOM agents on your Orchestrator servers, ensure that you take them out of Maintenance Mode now. Follow the process further up in this post to turn off Maintenance Mode.

Update System Center 2012 Integration Packs to SP1


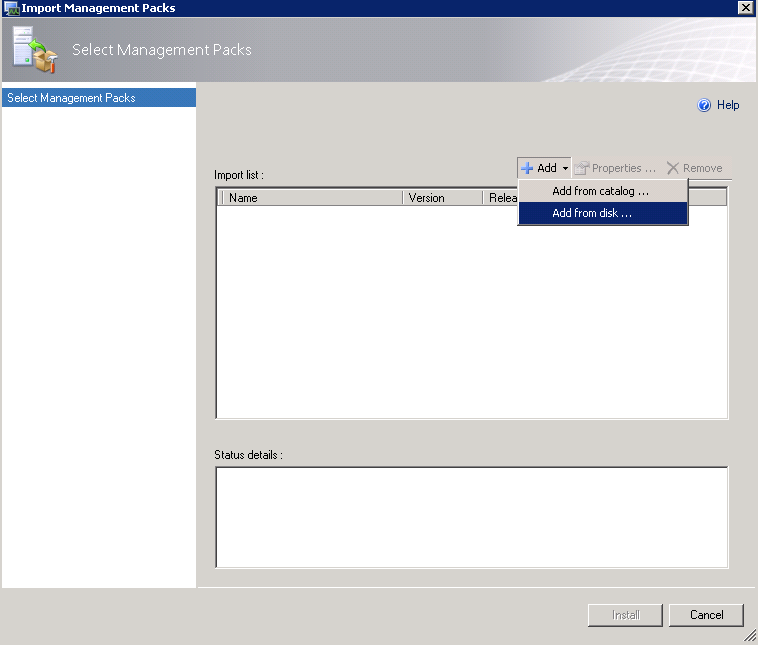
Once you have upgraded your Orchestrator environment to Service Pack 1, you will need to then upgrade any of your relevant integration packs to their available SP1 versions.  A couple of points to be aware of here though:

Note 1
Be aware that if you install an integration pack that is specifically for SP1, then any earlier version integration packs will need to be first uninstalled from all runbook servers and designers before you can deploy the new SP1 ones. You can then register and deploy the upgrade of the integration pack. If you do not uninstall the previous version of the integration pack prior to registering and deploying the upgrade version, the upgrade version will fail.

Note 2
To allow you the leeway to upgrade other System Center components as needed, after you have upgraded the Orchestrator servers to System Center 2012 SP1, you can run: 
  • A System Center 2012 integration pack against a System Center 2012 component.
  • A System Center 2012 SP1 integration pack against a System Center 2012 SP1 component.
  • No other configurations are supported.

On the 3rd January 2013, Microsoft released the 'System Center 2012 Service Pack 1 - Orchestrator Component Add-ons and Extensions'. It is highly recommended that once you have upgraded your other System Center 2012 products, that you then download these add-ons and extensions and deploy any integration packs that are relevant into your environment to ensure you get the most out of your Service Pack 1 experience.

Conclusion

That should be all you need to do now to upgrade Orchestrator 2012 to Service Pack 1. Ensure that you refer back to the 'Upgrade Sequencing for System Center 2012 SP1'. guide to ensure that you upgrade any other System Center 2012 products in the correct order.

Thursday, May 3, 2012

SCOM 2012 - Installing the SCOrch 2012 Management Pack

Following on from my previous post on Installing the SCVMM 2012 Update Rollup 1 Management Pack into SCOM, this post will detail the steps required to install and configure the System Center 2012 Orchestrator (SCOrch) Management Pack that will enable you to monitor the health and availability of the SCOrch servers that deliver automation to your environment.

Although some people may not think this is a function that they really care about, the focus of System Center 2012 is all about the automation and self-service of your environment and if your main automation server isn't working as expected, then it's defintiely something that you want to know about!

For this post, it is presumed that you have already installed System Center 2012 Orchestrator and that you have deployed the SCOM 2012 agent to your SCorch servers. If you haven't yet installed SCOrch, then check out this post I wrote last year on what to do:

Installing System Center Orchestrator 2012

To begin, download the 'System Center Monitoring Pack for System Center 2012 - Orchestrator' from the link below (as always, make sure to also download the associated MP guide and read it from front to back first before deploying to get a good understanding of what's required):

http://www.microsoft.com/en-us/download/details.aspx?id=29269

The following Pre-Requisites must be in place before you deploy the management pack:

  • The Windows Server 2008 Internet Information Services 7 Management Pack (version 6.0.6658 or later) must be imported to the management group prior to importing the Monitoring Pack for System Center 2012 - Orchestrator.

  • Windows PowerShell is required on Orchestrator Management Servers and Runbook servers.

Once you've the MP downloaded to a location on your SCOM 2012 Management Server, browse to the location and run the SC2012OrchestratorMP.EXE file to open up the licence agreement screen and click Yes to continue.


From the window below, choose a location to extract the MP files to,then click OK


Now open up the SCOM Console, click on the Administration button from the Wunderbar down the bottom left hand side of the screen, expand Administration\Device Management, right mouse click on Management Packs and then choose the Import Management Packs option from the resulting menu as below


From the Import Management Packs window, click on the Add button and choose the Add from disk option. Select No from the window that asks if you want to go online to search for dependencies


Now browse to the location on your disk that you extracted the SCOrch management pack files to from earlier, select the two .MP files and then click Open


Confirm that both management pack files are ready for import as in the screen below and click on the Install button to continue


Once the management pack files have been imported successfully, you will see the screen below with a status of Imported for each one. Click on the Close button to exit the window.


Once the management pack has been imported, click on the Monitoring button in the Wunderbar on the bottom left hand side of the SCOM Console. Once in the Monitoring window, you should now see a new folder called System Center Orchestrator that represents the new management pack you've just installed. If you expand this folder and click on the Components view, you should see a nice diagram view of your System Center 2012 Orchestrator configuration as the screen below shows


This completes the installation of the SCOrch 2012 management pack.

Sunday, October 16, 2011

Installing System Center Orchestrator 2012

In this blog post I'll walk through the steps involved to get the new Microsoft System Center Orchestrator 2012 BETA installed. System Center Orchestrator 2012 (also known as SCO or SCORCH) is the new name for the market leader 'Automation and Runbook' application Opalis that Microsoft aquired in late 2009.

Taken from the Microsoft System Center Blog:

System Center Orchestrator 2012 delivers 3 core benefits to customers:

  • Integration – Optimize and Extend your existing Investments
  • Orchestration – Deliver Flexible and Reliable Services
  • Automation – Lower Costs and Improve Predictability

The steps in this post are based on the BETA edition, although the installation steps will be the same for the final RTM version.

To start with, ensure you have a virtual or physical machine that meets the following pre-requisites:

Resources:

  • 1 gigabyte (GB) of RAM or above (2 GB recommended)
  • 200 megabyte (MB) of available hard disk space
  • Dual-core CPU or better
 
Software:

  • Microsoft Windows Server 2008 R2
  • Web Server Role (IIS) installed
  • .Net Framework 4
  • Sliverlight 4 (for the Orchestration Console)
  • Microsoft SQL Server 2008 R2

You can download the BETA from the link below:

http://www.microsoft.com/download/en/details.aspx?id=26503

Once you have downloaded the BETA to a location on the C drive of your new Windows Server 2008 R2 machine, right mouse click on the 'SystemCenterOrchestrator2012Beta.exe' installer and select 'Run As Administrator' to begin the process.


Choose a directory to extract the files to and select 'OK'


Now Right Mouse Click on the 'SetupSCO.exe' installer and select 'Run As Administrator' to begin the installation wizard


You should now see the 'System Center Orchestrator 2012 Setup' window and you will be presented with a number of installation options. SCORCH supports either a fully co-located installation of all the roles onto the same server or it also supports standalone installation of each component onto different servers if you so wish.


We're going to go for the co-located installation and install all of the components onto the one virtual machine, so click on the 'Install Orchestrator' option to continue


 The installer will now check to see if your machine has met the pre-requisites and will prompt you if something needs to be installed beforehand  - see the screen below


Once the pre-requisites have been met, the 'System Center Orchestrator 2012 Setup' wizard will continue. Accept the licence agreement from the screen below and click on 'Next'


From the 'Select Features to Install' screen, ensure that the feature(s) you want are selected and then click 'Next' to move on


Based on the features that you have selected to install, the Pre-Requisite checker will again run and check the requirements for these features against the computer you are installing onto. In the screen below,I haven't installed the .Net Framework 4.0 so this has been highlighted. It does provide a nice little link for me though to go and download the .Net Framework 4.0 which is a handy tip!


Once you have downloaded and installed the pre-requisites, click on the 'Verify Prerequisites Again' button and the installer should move on to the next step

In the next step, you need to create a user account within your Active Directory that will be used to run Runbooks and access remote system resources. This account must have at least local administrative privileges on the computer you are installing SCORCH onto along with 'Log on as a service' rights enabled too.


Once you have created the new account with the relevant administrative and logon as a service peissions on the SCORCH computer, click on the 'Test' button and the installer should confirm if all is in place to continue on. When you see the 'Credentials Accepted' message, then click 'Next'


At this point we are now ready to create the new Orchestrator SQL database and there are a couple of ways to do this. I am installing SCORCH into its own SQL instance on a remote SQL server and have already configured this before I have begun the SCORCH installation process.

Important Note: As was the case with SCOM, System Center Orchestrator 2012 needs an SQL collation setting of  - SQL_Latin1_General_CP1_CI_AS. If this collation setting is not configured, you WILL run into problems down the line with an issue relating to 'Send Email Activity not storing data'

The screenshot below shows the SQL collation setting being configured at the time of the SQL Instance installation


As I've installed a separate SQL instance for my SCORCH installation, I've made my SCORCH service account (srv_scorch) a member of the 'Sys Admin' role for this particular instance in SQL. The SCORCH service account needs to have at least 'db_owner' permissions on either the SQL instance or a pre-created empty SQL database named 'Orchestrator' before you continue with the SCORCH installer.

From the screen below, type in the SQL server name and instance (if applicable) and select either a new or existing database depending on your preferences, then click 'Next'


From the next screen, configure the Orchestrator management group and whether or not you want to grant remote access for the Runbook Designer (this option will have to be selected from a computer other than the Management Server however). Click 'Next' to continue


Leave the ports at their default values or change them to whatever you need to and then click 'Next' to continue on


Choose either the default installation path for SCORCH or browse to a different location and then click 'Next'


Confirm you are happy with the installation summary or if you need to change anything simply click on the handy 'Change' link option beside each section to go back directly to make your changes. Click 'Next' once you're happy to continue


Finally, once the installation is finished, you should see the screen below stating that 'Setup completed successfully'.


Click on 'Close' from the screen above and the new 'System Center Orchestrator Runbook Designer' window will now open confirming that you have installed SCORCH correctly!


 You can also now open the 'System Center Orchestrator Deployment Manager' from the 'Start Menu' as below


The screen below shows the new System Center Orchestrator Web Console - accessible from the port number that you specified during installation


So that completes the installation of SCORCH and for anyone who has had the hardship of installing Opalis 6.3 with the console, then you'll find this a much more pleasant and easier process than that one!

Now to see how hard I can push the integration of SCORCH with the other System Center products!