Showing posts with label SCAC. Show all posts

Tuesday, February 21, 2012

Come along to the Official Irish Launch of Microsoft System Center 2012!

The official Irish and Northern Irish launches for System Center 2012 have been confirmed by Microsoft Ireland for March 22nd in Dublin and March 27th in Belfast.

I've been asked to present a session as one of four speakers alongside the presenting talents of Aidan Finn (MVP Virtual Machine), Damian Flynn (MVP Cloud and Datacenter Management) and Paul Keely (MVP Cloud and Datacenter Management)!

Each event is a full day out and kicks off at 10:00 until 17:00. The Dublin event is being held in the Berkley Court Hotel and the Belfast event is being held at the Hilton Hotel.

Here's the agenda for the day:


Time
Session
10:00 – 10:30
Event Registration
10:30 – 11:30
Hear how Microsoft takes the experience of running the largest datacentres in the world and applies it to scalable management solutions for customers worldwide
11:30 – 12:00
Damian Flynn from Lionbridge Technologies shares the cost savings and efficiencies achieved from implementing System Center
12:00 – 13:00
Lunch
13:05 – 16:15
Real-world examples from Industry Experts
Demonstration based sessions sharing scenarios that you can take and apply to your business. Examples include Deep Application Insights, Cloud and Data Centre – Automation and managing from the desktop to the datacentre


And here's the BIO's for each of the speakers:

Subject Matter Experts

Aidan Finn (MVP - Virtual Machine), works for MicroWarehouse Ltd as a technical sales lead, working with Microsoft partners on Hyper-V, System Center and Forefront opportunities. He has been working with systems management technologies since 1996, and is experienced with Windows Server, desktop deployment and management, System Center, virtualisation, and so on. He blogs on http://www.aidanfinn.com, tweets as @joe_elway, and has written or contributed to books such as Mastering Hyper-V Deployment and Mastering Windows 7 Deployment.

Damian Flynn (MVP – System Center Cloud & Data Centre), works for Lionbridge Technologies (a Localisation, Logo Certification, Search & Content Services Company) as a Technical Architect of Corporate IT Infrastructure, working with the Business Stakeholders, IT Team, and Partners. Damian is a member of the Microsoft Windows Sever Futures Council, actively participating in multiple Microsoft TAP programs, and has being working on infrastructure technologies since 1994, with a high level of experience in Networking, Storage, Linux and Windows Servers, Virtualisation, System Center, etc. He blogs on http://www.damianflynn.com, tweets from time to time on @damian_flynn, and is a contributing author on the forthcoming book “Microsoft Private Cloud Computing”.

Kevin Greene (Subject Matter Expert – Microsoft System Center Operations Manager), works for Ergo Group Ireland. Kevin has been responsible for the deployment of a large number of System Center projects to enterprise level clients across all sectors. He blogs at http://kevingreeneitblog.blogspot.com and you can also find him on Twitter as @kgreeneit

Paul Keely (MVP – System Center Cloud & Data Centre), Paul has been working with System Center in its original from form for nearly ten years. He works for Infront Consulting group, a specialist system center practice that deploys system center to some of the biggest companies in the world.


You can register for the event on the Irish IT Pro website by clicking on the link below:

http://blogs.technet.com/b/ieitpro/archive/2012/02/21/system-centre-2012-launch-events-in-dublin-and-belfast.aspx

Registration places have already been filled so hurry up before it's booked out and I hope to see you there!!

Thursday, January 12, 2012

SCOM 2012 - Monitoring the System Center 2012 App Controller Website

Following on from my last post on the new '3-Tier (360)' Service Template, this post will go through the steps required to create a synthetic transaction within System Center 2012 Operations Manager (SCOM 2012) that will monitor a website URL and report back on latency or authentication errors.

The System Center 2012 Private Cloud Community Evaluation Program has been running for the last few months now and this weeks session was based mainly around the new System Center 2012 App Controller (AppController) product and it's management of private and public clouds combined.

Anyone can apply to join up to the System Center 2012 Private Cloud CEP and you can get more information from the link below:

https://connect.microsoft.com/site799/program7383

Keeping with the theme of the System Center 2012 Private Cloud CEP, I've decided to dedicate this post to the AppController management website URL and show how you can use SCOM to monitor its health state. You can however use the steps in this post to create a synthetic transaction web monitor for any URL you wish.

To get started, open up your SCOM 2012 console and click on the 'Authoring' tab down the bottom left hand side of the screen. Once you have this open, expand 'Management Pack Templates' on the left hand side and then right mouse click on 'Web Application Transaction Monitoring' as below


From the 'Add Monitoring Wizard', select 'Web Application Transaction Monitoring' as the monitoring type, then click 'Next'


Now enter in a friendly name for your website monitoring synthetic transaction, select an unsealed management pack to store it in, then click 'Next'


In the 'URL' field, input in the full URL of the System Center 2012 App Controller management website that you want to monitor and then click the 'Test' button (this URL doesn't have to be the AppController one and can be any website address that you like including over http or https). When you are happy with the results of the test, click 'Next' to continue


From the 'Watcher Node' screen, choose a server from the list that will be allocated the task of running the synthetic transaction. Specify also here how often you want this test to run from the watcher node server (e.g. every 15 minutes)


When you get to the final screen of the wizard, tick the box for 'Configure Advanced Monitoring or Record a browser session' and then click 'Create'


Once the monitoring wizard has created the synthetic transaction, the 'Web Application Editor' window will open and it is here that we can configure parameters to report back on things like the http status code, content matches and response times for your chosen website URL


If you click on the drop down menus in the 'Http Status Code' section, you can select a number of options to suit the error checking you want SCOM to report back on


For this transaction, I've selected 'Greater than or eqals' for the '401 - Unauthorised' http error code


and here, I've specifed  a response time of 'Greater than or equals' to '10 seconds' which means if it takes 10 seconds or more to open up my chosen website URL, then SCOM will report back with an error based on these criteria. We can configure the same or similar parameters in the section below but this will report back as a 'Warning' instead of an 'Error'


Ensure to click on the 'Verify' button when you've made the changes you want


 To complete, click on the 'Apply' button


To test your newly created web monitor, click on the 'Run Test' link on the right hand side of the screen and you will then be presented with a results screen detailing what the outcome of the test is as shown below


All that's left to do now is to close out of the test results and go back to the main 'Monitoring' tab within the SCOM console by clicking on the button down the left hand side of the screen. When here, locate the 'Web Application Transaction Monitoring' folder and expand it to show the 'Web Applications State' screen where you should see your newly created System Center 2012 App Controller Website synthetic transaction monitor


If you want to know more about System Center 2012 App Controller, then take a look at some of my previous posts from the links below:

Cloud Management with System Center - Connecting your private cloud to System Center App Controller 2012

Cloud Management with System Center - Customizing System Center App Controller 2012

Cloud Management with System Center - Connecting App Controller to Azure Part 1

Cloud Management with System Center - Connecting App Controller to Azure Part 2

Cloud Management with System Center - Integrating App Controller with SCOM

Wednesday, December 7, 2011

System Center 2012 Private Cloud Community Evaluation Program contest winner!!

Nice to see the email last night arrive into my inbox telling me that I had won the November competition for the Microsoft System Center 2012 Private Cloud Community Evaluation Program (CEP) as a result of my blog posts on 'Cloud Management with System Center'.

There were two aspects of the prize - a brand new Microsoft Touch Mouse and entry into a draw in February for a free MMS 2012 ticket!


If you want to learn more about Cloud Management with System Center, click on the links below for my posts:

Cloud Management with System Center - Building a Private Cloud with System Center Virtual Machine Manager 2012

Cloud Management with System Center - Creating a Virtual Machine Template with System Center Virtual Machine Manager 2012

Cloud Management with System Center - Creating a Service Template with System Center Virtual Machine Manager 2012

Cloud Management with System Center - Connecting your private cloud to System Center App Controller 2012

Cloud Management with System Center - Customizing System Center App Controller 2012

Cloud Management with System Center - Connecting App Controller to Azure Part 1

Cloud Management with System Center - Connecting App Controller to Azure Part 2

Cloud Management with System Center - Integrating App Controller with SCOM


The System Center 2012 Private Cloud CEP is running up until February and is open to anyone who wants to sign up. Click on the link below to start learning about how System Center is changing the way we manage our cloud infrastructures:

http://connect.microsoft.com/site799/program7383


Enjoy!

Thursday, November 24, 2011

Cloud Management with System Center - Integrating App Controller with SCOM

As part of my Year Zero session presentation, I wanted to show the integration between a number of System Center products while highlighting Cloud Management and the IT as a Service model.

As System Center App Controller 2012 is still in BETA and the integration between all the System Center 2012 products is still not fully finished, I decided to do my own type of basic integration to allow an administrator to manage their clouds from the same server / screen that they are using for their SCOM console. I decided to create a custom SCOM task that can launch the App Controller Console from within a SCOM Distributed Application
This is more a customisation than integration but none the less – it works for me until we get a Management Pack for App Controller into SCOM 2012!

This post also coincides with the new Microsoft Private Cloud Community Evaluation Program starting up and you can sign up at any time to the CEP by clicking on the link below (you will need a Microsoft Live ID to sign in):


To begin, you need to have already installed System Center App Controller 2012 and configured it with your public and or private clouds. See the links below for more information on App Controller as part of this blog series:

Installing System Center App Controller 2012

Cloud Management with System Center - Connecting your private cloud to App Controller

Cloud Management with System Center - Connecting App Controller to Azure

Deploying the SCOM Agent

When you have App Controller installed, you need to deploy the SCOM agent to the App Controller server.

I’ll be carrying these steps out on a SCOM 2007 R2 server as opposed to SCOM 2012 as SCOM 2007 R2 is more prevalent at the moment and will be the main production monitoring application people are using for the coming months. These steps will work exactly the same however with SCOM 2012.

Follow the screens below to complete the 'Discovery Wizard' and to install the SCOM Windows agent onto your App Controller server.


Once the above steps have been completed, you should then have your SCOM agent deployed to your System Center App Controller 2012 server.

Creating the Custom Task

At this point, you should have your SCOM agent deployed to your App Controller server and a custom group created that includes the new App Controller agent.

To enable us to launch the App Controller console from the SCOM console, we need to create a custom task within SCOM that evokes a URL shortcut to the App Controller console.

First, logon to your App Controller server and double click on the App Controller icon on the desktop


When the console logon window opens, just copy or make a note of the full URL address in the address bar


Now, log back onto the server with your SCOM console installed. Open up Internet Explorer and browse to the App Controller URL shortcut.

Once it opens, click on ‘File’, ‘Send’ and select ‘Shortcut to Desktop’. This will create a shortcut on the desktop of your SCOM console server that links back to the App Controller console on your App Controller server. Move this shortcut now to a folder on the ‘C’ drive called ‘SCOMCustomTasks’


Now, open up the SCOM console, go to the ‘Authoring’ tab in the Wunderbar, expand ‘Management Pack Objects’, right mouse click on ‘Tasks’ and then select ‘Create a New Task’ as below


In the 'Create Task Wizard' window, select 'Console Tasks' and then 'Command Line', ensure you are saving the new task to a custom unsealed Management Pack (that IS NOT the 'Default Management Pack!) then click 'Next'


Enter a description for the custom task and then select the 'Windows Server' class as the target as below


Now in the 'Application' field, type the text below (the path below presumes you have followed all of the above steps and have created the folder and shortcut names identically):

"C:\SCOMCustomTasks\App Controller.url"

Untick the 'Display output when task is run' box and then click 'Create' to complete the custom task creation.


Once you have your custom task created, anytime you click on your System Center App Controller server within SCOM, you will see the 'App Controller Console Launch' action present in the 'Actions' window on the right hand side of the screen.

The screenshot below is the Distributed Application Service that I built for the Year Zero event and I have highlighted in RED the App Controller server in the diagram and its associated custom task on the right.


Notice also, that this process is not by any means specific to just App Controller. If you look at the diagram above you will see I have created a similar custom task to enable me to launch my System Center Orchestrator 2012 console too (see the 'Orchestrator Console Launch' action on the right).

Now thats what I call central management with SCOM!!!!

Friday, November 18, 2011

Cloud Management with System Center - Connecting App Controller to Azure Part 2

This is Part 2 of my post on 'Connecting App Controller to Azure'.These posts are part of a bigger series titled 'Cloud Management with System Center' and if you haven't read any of the other posts in the series, you can start from the links below:

Installing System Center App Controller 2012

Cloud Management with System Center - Building a Private Cloud with SCVMM 2012


In Part 1 of 'Connecting App Controller to Azure', I walked through the steps required to create a self-signed certificate on your App Controller server and how to export that into both .PFX and .CER formats.

With the certificates exported you are now ready to start working in Azure to get the connection created.

Adding your management certificate to Azure

The following procedure presumes that you already have a subscription setup within Windows Azure and are ready to add a management certificate to that subscription. If you haven't yet got a subscription or an Azure account, you can get more information here on whats needed to get you started.

First up, you need to login to the Windows Azure Platform Management Portal with the relevant credentials that allow you permissions on the subscription to add management certificates.

In the navigation pane, click 'Hosted Services, Storage Accounts & CDN' and then at the top of the navigation pane, click Management Certificates.


On the ribbon at the top left hand side of the screen, in the Certificates group, click Add Certificate

The Add New Management Certificate dialog box opens.

In Choose a subscription, select the Windows Azure subscription to add the management certificate to.

In Certificate file, use the Browse button to select the .CER file for the exported certificate


When you have all of the information added in, click 'OK'

Once created, you should see it listed under your subscription as below


Now that we have added the .cer certificate file to our Azure subscription, we need to create the connection between App Controller and Azure while adding the .pfx file with the encryption key to the App Controller connection.

Connecting App Controller to your Windows Azure Subscription

Open up the System Center App Controller 2012 console and click on the 'Clouds' link on the left hand side of the screen

Now click the 'Connect' button and then select 'Windows Azure Subscription' from the drop-down menu


In the 'Connect' dialog box, enter a name for this subscription. This name is displayed in the Name column of the Clouds page.

Add an optional description in the Description text box.

In the Subscription ID field, enter the subscription ID for this connection. The Windows Azure subscription ID is a GUID and can be found in the Windows Azure Management Portal.

To import the required management certificate, select the Personal Information Exchange (.pfx) file for the public key you uploaded to Windows Azure and enter the password for the certificate


Click 'OK' to create the connection

Once the connection is verified and complete, you will see your Azure Public Cloud available in App Controller for management under a single console


This completes the steps required to create the connection between your public Azure subscription and System Center App Controller 2012.

This series of posts also coincide with the new Microsoft Private Cloud Community Evaluation Program starting up and you can sign up at any time to the CEP by clicking on the link below (you will need a Microsoft Live ID to sign in):

Cloud Management with System Center - Connecting App Controller to Azure Part 1

Welcome to the sixth instalment in my series on 'Cloud Management with System Center' and in this post I will be explaining how to connect System Center App Controller 2012 (SCAC 2012) to the Microsoft public cloud offering - Azure.

If you want to know how to install System Center App Controller 2012 or haven't read the other posts in this series, then check out the links below for more information:

Installing System Center App Controller 2012

Cloud Management with System Center - Building a Private Cloud with SCVMM 2012


So, to begin with, here is a high level overview of what is required to connect your App Controller installation to a Windows Azure subscription:
  • Obtain / Create either a public or self-signed certificate for authentication
  • Add the certificate to Azure as a Management Certificate
  • Add the certificate to App Controller with Private Key attached
  • Create the connection within App Controller to connect to the Azure subscription
Sound easy so far? That's because it is! If you have a good handle on certificates and how they work, a basic knowledge of Azure subscriptions and a server or two to use, then you will be connected to the public cloud in no time!

For the purpose of this series, I will be using a self-signed certificate for authentication purposes but would always recommend using a trusted 3rd party CA in a production environment for additional security.

There are a number of ways that you can create a self-signed certificate and none of them are the right or wrong way but in this example, I will be using the IIS Manager on the App Controller server to create the certificate.

Using IIS to Create your Self-Signed Certificate

Open the Internet Information Services (IIS) Manager by typing inetmgr in the Start menu textbox

In the IIS section of the center pane, double-click Server Certificates


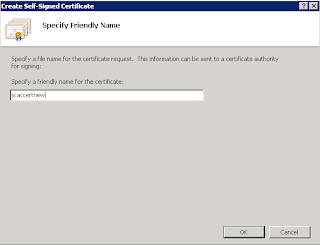
Click Create Self-Signed Certificate, and then finish the wizard


Once you have completed the certificate creation wizard, you will see your new certificate listed in the central window 'Server Certificates' window as below


Double clicking on the certificate will confirm to you that you have a new certificate issued today with a private key that corresponds to it


Now that we have our certificate created within IIS, we need to export this certificate as a .PFX file which essentially is your certificate with the private key attached and will be the file needed when creating the App Controller side of the connection

Exporting a .PFX file using IIS Manager

Open the Internet Information Services (IIS) Manager by typing inetmgr in the Start menu textbox and then in the IIS section of the center pane, double-click Server Certificates, right-click the certificate in the center pane, and then click Export.


Select the location for the file, enter the name for the file, and enter the password for the private key


Click 'OK' to complete the .PFX export.

Exporting the .CER certificate file with Certificate Manager

At this point we have our new self-signed certificate added to the Certificate ‘Local Computer\Personal Store’ of our App Controller server (the IIS certificate creation automatially does this) and we have also exported the certificate as a .pfx file which contains the private key of the certificate.

We must now export the certificate again from the personal store but this time we wont be exporting the private key and as such we want to end up with a certificate that ends in a .cer extension.

To do this, open up your Certificate ‘Local Computer\Personal Store’ by clicking on ‘Start’, ‘Run’ then typing ‘mmc’ and clicking ‘Enter’

Now click on ‘File’, select ‘Add/Remove Snapin’ and then double click on ‘Certificates’ from the ensuing list

This now opens up the ‘Certificates’ snapin and it is imperative that you select ‘Computer Account’ from the menu that comes up as below


Once you have selected ‘Computer Account’, click on ‘Next’ and then click ‘Finish’ from the next screen leaving the default selection of ‘Local Computer’ enabled

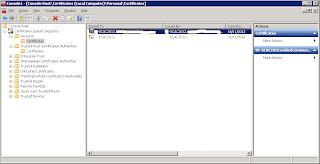
Now you need to expand down to the ‘Certificates\Personal\Certificates’ folder as below and you should see any certificates that have been created and self-signed to this server


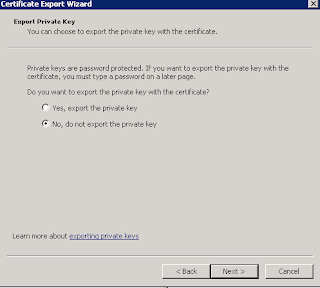
To export the certificate as a .cer file with no private key, follow the screenshots below


Make sure you select 'No, do not export the private key' here


You should now have two files on the C drive of your App Controller server, one is a .cer and the other is a .pfx


In the Part 2 of this post I will explain how to import these certificates into Azure and App Controller and also how to then configure the link between the two.

This series of posts also coincide with the new Microsoft Private Cloud Community Evaluation Program starting up and you can sign up at any time to the CEP by clicking on the link below (you will need a Microsoft Live ID to sign in):