Thursday, February 9, 2012

SCOM 2012 - Run Remote Desktop from any alert in the Console

It has been a real busy few weeks for me in work and I've hardly had any time to blog/tweet about System Center 2012 since the middle of January!

Since my last post, I've been working on a mixture of System Center and Hyper-V projects both day and night so a severe lack of sleep distracted me from posting this really neat trick I've worked out to make managing and resolving alerts in SCOM much easier from the console.

The steps outlined in this post although referencing System Center 2012 Operations Manager, will work exactly the same for System Center Operations Manager 2007 R2.

I was working on System Center 2012 Operations Manager (SCOM) yesterday and was tuning out some alerts generated by some new management packs I had deployed when I found myself having to logon to the servers generating the alerts using Remote Desktop quite regularly.

Now, if the alert generated in SCOM is from the 'Windows Server Operating System' management pack, then this management pack comes with some built in 'Tasks' that can be run from the 'Tasks/Actions' menu on the right hand side of the screen.

These tasks can be seen from the Monitoring window below once you have clicked on an alert in the Console that was generated by the Windows Server OS MP


A closer look shows us all of the available tasks that we can run under this context


As we can see from above, one of these Windows Server Operating System Management Pack tasks is the ' Remote Desktop' task

When you click on the 'Remote Desktop' task, it then opens up the RDP application (mstsc.exe) with the computer name of the server that generated the alert in SCOM and all you have to do is click once to connect to the server to carry on your troubleshooting and alert tuning.

Now, this is all well and good if you are troubleshooting an alert that is related to the Windows Server Operating System Management Pack. What if the alert has been generated by another Management Pack? The answer is simple enough - you don't get the Remote Desktop task!!

The screenshots below show an example of the different tasks/actions that come with the SQL Management Pack


The tasks that come with the SQL Management Pack are specific to SQL Server troubleshooting and completely different to the Windows Server Operating System Management Pack tasks. Although the Management Pack specific tasks are really helpful and can assist in resolving most alerts quickly, if I wanted to Remote Desktop to the SQL server generating the alert above, I would either have to initiate an RDP connection myself from the 'Run' command using 'mstsc.exe' or if I wanted to use SCOM to initiate the RDP connection, I'd have to browse to the 'Windows Server' view or the 'Discovered Inventory' view to kick off the connection.

I just found having to carry out these extra steps on a constant basis was getting to be a bit of a pain and I started out looking for a solution to enable the RDP connection from any alert within the SCOM Console irregardless of the Windows Server OS Management Pack.

The solution to this problem is to create our own custom RDP task that will run independently of any management pack but with the same parameters as the 'Windows Server OS MP' RDP task.

To begin creating the new task, open up the System Center 2012 Operations Manager Console and click on the 'Authoring' tab from the wunderbar down the bottom left hand side.

Now click on 'Tasks' on the left hand side and then 'Change Scope' from the middle of the screen and modify the search scope to be just 'Windows Server'

You should see all of the tasks associated with the 'Windows Server Operating System' Management Pack as below


Double click on the 'Remote Desktop' task in the central window and have a look at the pre-defined parameters


Copy the text from the 'Application' line in the window above into a text editor such as Notepad and you should have a line like this:

%windir%\system32\mstsc.exe

Note that the 'Parameters' line of the screen above has a specific parameter that defines the 'Microsoft.Windows.Computer' class. There's no point in copying this line to your text editor as it won't work when we go to create our new custom RDP task.

Close the RDP task properties that's open from above and then select the 'Create New Task' option from either the 'Task' menu on the right hand side or by right mouse clicking on the 'Tasks' link on the left hand side.

When the 'Create Task Wizard' opens up, click on the 'New' button to create a new custom unsealed management pack so as to store the new custom task


Input a name and description into the relevant fields for the custom unsealed management pack and then click 'Next'


In the final screen of the 'Create a Management Pack' wizard, click on the 'Create' button and you will then return to the 'Create Task Wizard' screen with your new unsealed management pack selected as a destination as shown below.


Make sure you select the 'Alert Command Line' option under 'Console Tasks' and then click 'Next' to continue

From the screen below, enter a task name such as 'Run Remote Desktop' (try not to name it simply 'Remote Desktop' as you may get mixed up at a later date if you are trying to troubleshoot issues with this task or the original 'Remote Desktop' task from the 'Windows Server OS' MP. Type a description and then click 'Next' to continue


Now, it's at this step that you will run into problems (as I did when I got to this point initially!), if you don't enter in the information exactly as I specify.

In the 'Application' field, copy the text path to your RDP application from your text editor that you had saved earlier and you should have something like:

%windir%\system32\mstsc.exe

I ran into problems when trying to find a parameter that would work that could automatically add in the computer name reference that was generating the alert in the SCOM Console once the RDP connection prompt opened up. Thankfully after loads of searching and reading up on SCOM powershell commands, I came up with the 'secret sauce' solution to make this work!!

If you want to run the 'mstsc.exe' application while specifying a server, you need to use the /v:servername switch. However as we won't be entering in a new server name manually each time we fire up an RDP connection, I needed to find the correct reference that SCOM uses and I came across $MonitoringObjectPath$

With the above syntax worked out, all we need to type into the 'Parameters' field is the following:

/v: $MonitoringObjectPath$


The last setting we need to make in the screen above is to de-select the 'Display output when this task is run' option and then click on the 'Create' button to complete the process

Now, if you go back to the 'Monitoring' tab of the SCOM Console and click on any alert, you should now see an additional 'Alert Tasks' menu on the right hand side of the screen with an entry for 'Run Remote Desktop' as the two screens below show.


This new 'Alert Tasks' menu will appear above the specific management pack tasks menu every time you click on an alert. The example above shows the 'SQL' specific tasks along with the new 'Alert Tasks' option and the screen below shows the 'Windows Server 2008 Logical Disk Tasks ' also with the new 'Alert Tasks' option above it.


If the alert that is being generated in the SCOM Console has been generated by a Windows Server with the SCOM agent installed, then your new 'Run Remote Desktop' custom task will run every time making it nice and easy to troubleshoot and keeping all administrative duties within the single SCOM Management Server.

Tuesday, January 17, 2012

System Center 2012 Private Cloud CEP MMS 2012 Ticket Winner!!


"Congratulations!  You have won a ticket to MMS 2012 (http://www.mms-2012.com/) through the Private Cloud Community Evaluation Program Community Contest!"

It was so nice to wake up this morning to the sight of the above email in my inbox telling me I've won a free ticket to the Microsoft Management Summit 2012 In Las Vegas as part of my participation and efforts contributing to the Microsoft System Center 2012 Private Cloud Community Evaluation Program (CEP).

This email follows hot on the heels of delivery of my Microsoft Touch Mouse that I also won from the CEP as the November winner of the contest.

 I can't think of a better technical program that I've been involved in that has such expert speakers with deep levels of technical content sessions and one that rewards participants in this way with prizes of such great nominal and educational value.

There is still some time left to go on the System Center 2012 Private Cloud CEP and you can sign up at any time from the link below:

https://connect.microsoft.com/site799/program7383

If you want to learn more about the new range of System Center 2012 products that are due to be released in the first half of this year or want to look over some of the blog posts that won me this competition, then click on any of the links below:

Installation:

Installing System Center Virtual Machine Manager 2012

Installing System Center App Controller 2012

DPM 2012:

Upgrading System Center DPM 2010 to DPM 2012 Part 1

Upgrading System Center DPM 2010 to DPM 2012 Part 2

Managing and Monitoring System Center DPM 2012 with SCOM Part 1

Managing and Monitoring System Center DPM 2012 with SCOM Part 2

Managing and Monitoring System Center DPM 2012 with SCOM Part 3

Cloud Management with System Center:

Cloud Management with System Center - Building a Private Cloud with System Center Virtual Machine Manager 2012

Cloud Management with System Center - Creating a Virtual Machine Template with System Center Virtual Machine Manager 2012

Cloud Management with System Center - Creating a Service Template with System Center Virtual Machine Manager 2012

Cloud Management with System Center - Connecting your private cloud to System Center App Controller 2012

Cloud Management with System Center - Customizing System Center App Controller 2012

Cloud Management with System Center - Connecting App Controller to Azure Part 1

Cloud Management with System Center - Connecting App Controller to Azure Part 2

Cloud Management with System Center - Integrating App Controller with SCOM

SCOM 2012:

SCOM 2012 - Network Monitoring Magic!

SCOM 2012 - The All New 3 Tier Application (360) Service Template

SCOM 2012 - Creating your very own custom Distributed Application Template

SCOM 2012 - Recording a Web Browser Session

SCOM 2012 - Monitoring the System Center 2012 App Controller Website

Thanks for reading and 'Viva Las Vegas!'

Friday, January 13, 2012

SCOM 2012 - Creating your very own custom Distributed Application Template - Part 3

This is the final post in my 3 part series on 'SCOM 2012- Creating your very own custom Distributed Application Template'. You can review Parts 1 & 2 of the series from the links below:

SCOM 2012 - Creating your very own custom Distributed Application Template - Part 1

SCOM 2012 - Creating your very own custom Distributed Application Template - Part 2

This series was created with the Microsoft System Center 2012 Private Cloud Community Evaluation Program (CEP) in mind and you can sign up or get more information on the program from the link below:

https://connect.microsoft.com/site799/program7383

This post will cover the final steps in the process such as editing the unsealed XML file, sealing the unsealed template and then importing it back into SCOM and testing that it works.

Carrying on from where we left off in Part 2, you should now have three files copied to the C:\MP directory on the root of your SCOM 2012 Management Server local disk. The three files are the unsealed distributed application template, the strong name key and the 'MPSeal' utility

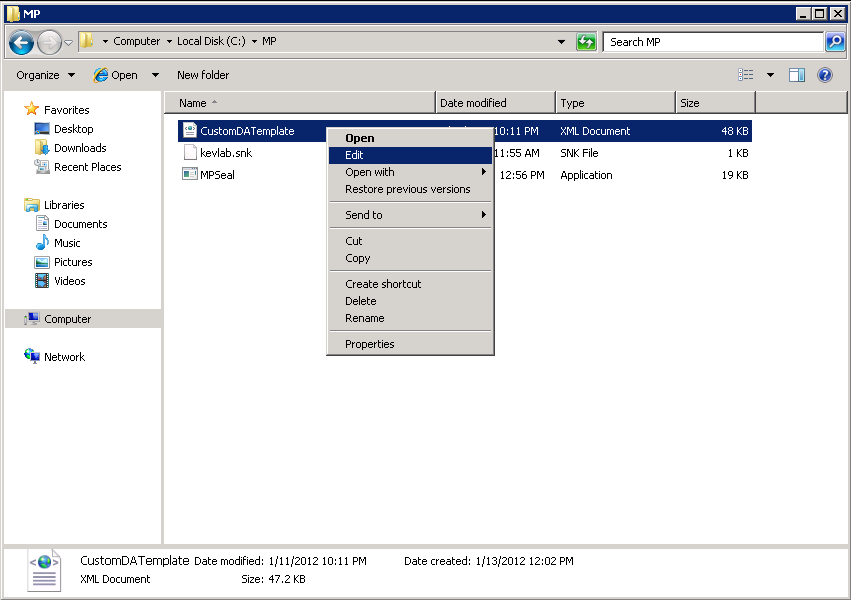
Right mouse click on the unsealed custom template and select 'Edit' from the drop down menu


When the file opens, locate the string near the top of the file that starts with <ID> and replace the string name in there with the exact name that you gave to the unsealed distributed application template - making sure that you exclude the .XML extension. In the example below, I have called my file CustomDATemplate.xml so therefore the string that I will be adding as the <ID> is simply: CustomDATemplate as shown below


Three lines below the <ID> line, is another one called <NAME>. Again, replace the string that is in here with a display name that describes what the template is. See the graphic below for more


Once you have edited the file with the correct ID and Display Name, you need to confirm the location of your system management packs that were installed initially with SCOM 2012. The default installation of SCOM 2012 RC drops the system sealed management packs into the following location: C:\SCOM2012RC\ManagementPacks (see the screen below)


Note: The location of the system sealed management packs is important because we will need to specify this location when running the MPSeal utility against the unsealed template.

Now open up a command prompt with administrative privileges, browse to the C:\MP directory and run the following command - substituting file names and locations where necessary:

mpseal customdatemplate.xml /i c:\scom2012rc\managementopacks /Keyfile scomkey.snk /Company "Ergo"


The MPSeal utility then runs a verification and check on the unsealed template against its Management Pack references and ensures it can access any sealed dependencies from the specified location


Once the utility has finished, you should see the screen below confirming that the new .MP sealed file has been created


Browse back to the C:\MP directory and you will see two new files there now, one of which is your new sealed management pack - at last!!


Now all that's left to do is to import this into SCOM 2012 and test it!

Browse to the 'Administration' tab of the SCOM 2012 console, right mouse click on the 'Management Packs' link and then select 'Import Management Packs'


Click on 'Add' and then select 'Add from disk'


Click 'No' to confirm you don't want to search online for dependancies


Browse to the C:\MP directory on the SCOM 2012 Management Server and you should see both the sealed and unsealed Management Packs that reference your template. Click on the one that has the .MP extension and click on 'Open'


SCOM 2012 should quickly check the Management Pack and report back that it is OK to add into the environment. Click the 'Install' button to begin


Once completed you should see the 'Imported' status and you can then click 'Close'


When you take a look at the list of management packs imported into SCOM 2012, you should see your new one in there with a sealed reference of 'Yes' beside it


Now to test that the template works, open up the 'Authoring' tab again and right mouse click on 'Distributed Applications', then select 'Create a new distributed application' from the resulting menu


This time, you should see a new addition to your list of Distributed Application templates that you can choose from. Give it a name and description, select your new template and a management pack to store it in, then click 'OK'


 The new distributed application should open up exactly the way that you configured it to every time! No more having to create new custom component groups each time you want to build a distributed application with the same components (in my case it would have been 90 times!)


Populate the component groups with objects as below


Save the new distributed application and check that it appears in the list of distributed applications and then right click on it and select 'Diagram View'


Now you should see the Diagram View of your newly created Distributed Application Service using your very own custom sealed Distributed Application Template!


If you want to learn more about System Center 2012 products and in particular SCOM 2012, check out some of my previous posts below:

Cloud Management with System Center - Building a Private Cloud with System Center Virtual Machine Manager 2012

Cloud Management with System Center - Creating a Virtual Machine Template with System Center Virtual Machine Manager 2012

Cloud Management with System Center - Creating a Service Template with System Center Virtual Machine Manager 2012

Cloud Management with System Center - Connecting your private cloud to System Center App Controller 2012

Cloud Management with System Center - Customizing System Center App Controller 2012

Cloud Management with System Center - Connecting App Controller to Azure Part 1

Cloud Management with System Center - Connecting App Controller to Azure Part 2

Cloud Management with System Center - Integrating App Controller with SCOM

SCOM 2012 - Creating your very own custom Distributed Application Template - Part 2

In Part 1 of this short series, I explained my reasons for wanting to create my own custom Distributed Application Template and also kicked off the download and installation of the Windows SDK software that will be needed later on.

In this post, we will build the custom distributed application the way we want it and then export it out of SCOM as an unsealed .XML Management Pack. Once that's done we will start the process on sealing the management pack using the Windows SDK tools.

Open the SCOM console and click on the 'Authoring' tab on the left hand side of the screen, then right mouse click on 'Distributed Applications' and select 'Create a new distributed application'


In the Distributed Application Designer window, type a name and description, select the 'Blank (Advanced)' option, choose an unsealed management pack to store the distributed application into and then click on 'OK'


Within the Distributed Application Designer workspace window, add the component groups and relationships as you wish but don't add in any servers or objects. Just the base template is all that we need at this point. It can be as complex or as basic as you like, to keep things simple, I have just added in three component groups below with some basic relationships


Once you're happy with your template, click on 'File' and then select 'Save as Template' from the drop down menu


Give the template a meaningful name and try to avoid any unusual characters as you will be referencing this name at a later step in this process. When you've named the template, save it to the local drive of your server as a .XML file


Click 'OK' from the message below confirming that you will have to make some changes to the template before it can be imported back into SCOM


Now, on the server that you installed the Windows SDK files to (in this case it's a SCOM 2012 Management Server),  browse to the Microsoft Windows SDK 'CMD Shell' shortcut from the Start Menu and open it with adminsitrative permissions


When  you have the CMD Shell open, you need to use the 'Strong Name Tool' (sn.exe) utility that comes with the Windows SDK to create a key file that will be used to seal the unsealed distributed application template management pack.

Type the following (you can change the .SNK file name to whatever you wish) in the CMD Shell to create your key file:

sn -k scomkey.snk


Once the above command completes, browse to the location of the installed SDK files and you should see your new .SNK key file ready to go. The default location of the SDK files is:

C:\Program Files\Microsoft SDKs\Windows\v7.0


When you have located your new key file, create a new folder on the C:\ drive of your server called 'MP' and copy the new .SNK keyfile and the unsealed custom distributed application template along with the 'MPSeal' utility from the SCOM Support Tools directory all into this new folder.

The SCOM 2012 RC Support Tools are located at the following location for a 64 Bit server:

C:\SCOM2012RC\SupportTools\AMD64


At this point, you should now have three files in the new C:\MP folder on the local disk of your SCOM 2012 Management Server as the screenshot above shows

In Part 3 of this series, I will go through the process of editing the ID and Name of the custom template along with sealing it and importing it back into SCOM to complete the process.

If you want to learn more about System Center 2012, then you can sign up for the Microsoft System Center 2012 Private Cloud CEP from the link below:

https://connect.microsoft.com/site799/program7383

SCOM 2012 - Creating your very own custom Distributed Application Template - Part 1

Over the last 12 months I've been working on some pretty nice System Center Operations Manager (SCOM) projects but I find that the larger the customer site / IT infrastructure, the more repetitive tasks there are to be carried out!

One such project I've been working on requires the creation of over 90 distributed applications that will reflect each of the remote sites around the globe that SCOM is monitoring. Each of these 90 distributed applications would contain the exact same component groups - for example, they'd all have a Domain Controllers group, a File Server group, an SQL group and a Web Sites group. The only difference for each of the 90 distributed applications would be the actual windows servers that would be members of each of the component groups as they would be specific to each of the sites they were located in.

To build a distributed application with only four component groups is real easy but the problem is when you have to go and create the same distributed application 90 times - not fun!!

This process will work exactly the same on both SCOM 2007 R2 and SCOM 2012 and I'll be demonstrating this on SCOM 2012.


SCOM 2007 R2 comes with three distributed application templates:

  • Line of Business Web Application
  • Messaging
  • Blank (Advanced)


SCOM 2012 comes with four distributed application templates:
  • 3-Tier Application (360)
  • Line of Business Web Application
  • Messaging
  • Blank (Advanced)


Although a new distributed application template (3-Tier Application (360) - see my previous post on this for more information) has been added to SCOM 2012, it is still limited to 3 tiers and a client perspective component group which probably won't be flexible enough to fit in with the type of distributed application you might want.

As a result of these template limitations, I set out to build my own template that incorporated all of the customer specific component groups that I wanted and one that could be easily deployed alongside the default templates that came out of the box with SCOM.

To begin with, we will first need to download  and then install the Windows Software Development Kit from the following link:


When you have downloaded the SDK, kick off the installer and move through the following screens


Make sure you select all of the components here, including the 'Redistributable Components' at the bottom


This screen can take a little while to complete but when it has all finished, you can close the SDK installer and move on to the next steps which I will cover in Part 2.